Around my birthday, a certain brand’s “stringless guitar” went on sale, and I almost bought one as a gift for myself. But after thinking it over, I realized that while the concept and form factor were appealing—especially for complete beginners or people focused on singing and accompaniment—it still wasn’t really a true musical instrument.
That thought, however, led me in a different direction: if even entry-level electric guitars cost well over a thousand yuan, and there are already ready-made 3D-printable models online, why not just build one myself?


And so began a 20-day project (including the May Day holiday) full of trial and error. Starting from scratch, I learned how to solder, repeatedly reworked parts, burned through wires, snapped guitar strings… and eventually ended up with a fully playable electric guitar that cost only RMB 570 to build. This article documents the entire journey, including the lessons learned and pitfalls encountered along the way. Hopefully it can serve as a useful reference for anyone interested in trying something similar.

Project Overview: From Model to Finished Instrument
Overall Build Process
Choose the model → Select materials → Purchase parts and components → Decide on the color scheme → Design the pickguard graphics and LED effects → Plan the LED circuitry and switch placement → Print → Assemble → Tune and test
Materials and Total Cost
| Item | Cost |
|---|---|
| 2 kg of PLA filament | RMB 100 |
| Roasted maple neck | RMB 165 |
| Pickup + bridge | RMB 55 |
| Pre-wired potentiometer assembly | RMB 30 |
| Ernie Ball guitar strings | RMB 35 |
| LED-related components (Li-ion charging board, battery, switches, etc.) | RMB 20 |
| Carbon-fiber reinforcement rods | RMB 50 |
| Miscellaneous hardware (string tree, strap buttons, output jack, etc.) | RMB 100 |
| Total | RMB 570 |
Choosing the Model: Why I Went with the Bambucaster
After narrowing things down, I ended up with two candidate models:
- Bambucaster Electric Guitar – Free 3D Printable Model – MakerWorld (Telecaster-style body)
- Fishcaster-Lite – Built-in Speaker Playable Electric Guitar – Free 3D Printable Model – MakerWorld (Built-in speaker, Stratocaster-style body)
After carefully weighing the options, I ultimately chose the first model. Although the second model was created by a Chinese designer, featured a beginner-friendly Stratocaster-style body, and even included a built-in speaker, I felt it might introduce additional complexity for a first-time build. On top of that, I simply preferred the look of a Telecaster-style body, which sealed the decision.
The quality of the Bambucaster model is genuinely impressive. It is based on the Prusacaster—a design inspired by Prusa, the well-known 3D printer manufacturer—and there are even professionally produced build videos available on YouTube. The model includes a number of thoughtful improvements, such as heat-set threaded inserts for securing the body, slots for reinforcement rods to improve structural strength, and a rather eye-catching LED lighting system.
The only downside is that the original creator’s documentation is extremely concise. Looking back after completing the build, I can see that every point they mentioned was important. However, because I lacked some fundamental knowledge—both about electric guitars themselves and about electronics soldering—I ran into quite a few obstacles along the way. At one point I was even joking to friends that the instructions felt a little too “free-spirited” and assumed far more prior knowledge than a beginner would realistically have.
Material Selection: PLA Is Actually a Better Choice Than PETG
The materials discussed here mainly refer to the guitar body. The honeycomb section, the upper shoulder piece, and the pickguard do not appear to have particularly strict material requirements.
Most people would naturally assume that PETG is the stronger option. However, after taking a closer look at the Prusacaster blog, I discovered that what the guitar body actually needs is a material with greater stiffness to resist the tension of the strings. Somewhat surprisingly, the recommended choice is PLA. Of course, if you have access to them, PLA-CF or ABS would likely be even better options.
Since the body design incorporates reinforcement rods, my understanding was that standard PLA Basic would be perfectly adequate. The original designer used 8mm carbon tubes for reinforcement, but I opted for solid carbon rods instead. They feel more robust and sturdy, although inserting them requires a bit more effort. Cheaper hardened steel rods or linear shafts would probably work as well.

Buying the Parts: Skip the Kit, Source Components Individually for More Flexibility
The original model creator purchased a Harley Benton hardware kit from an overseas retailer. There are similar kits available on Chinese e-commerce platforms for around RMB 200, but after taking a look, I felt some of the components seemed rather rough and basic. After doing a bit more research, I realized that buying a kit is completely unnecessary—we don’t actually need the body or the pickguard included in those kits, since both will be 3D printed anyway.
- Main Components: Neck, pickup, bridge, and electronics assembly (standard Telecaster-spec parts work perfectly fine)
- Additional Components: String tree, strap buttons, output jack, and LED-related parts
- LED Components: Lithium battery charging board, 1850B lithium battery, battery holder, three-pin two-position toggle switch, wiring, and bare-board LED strip

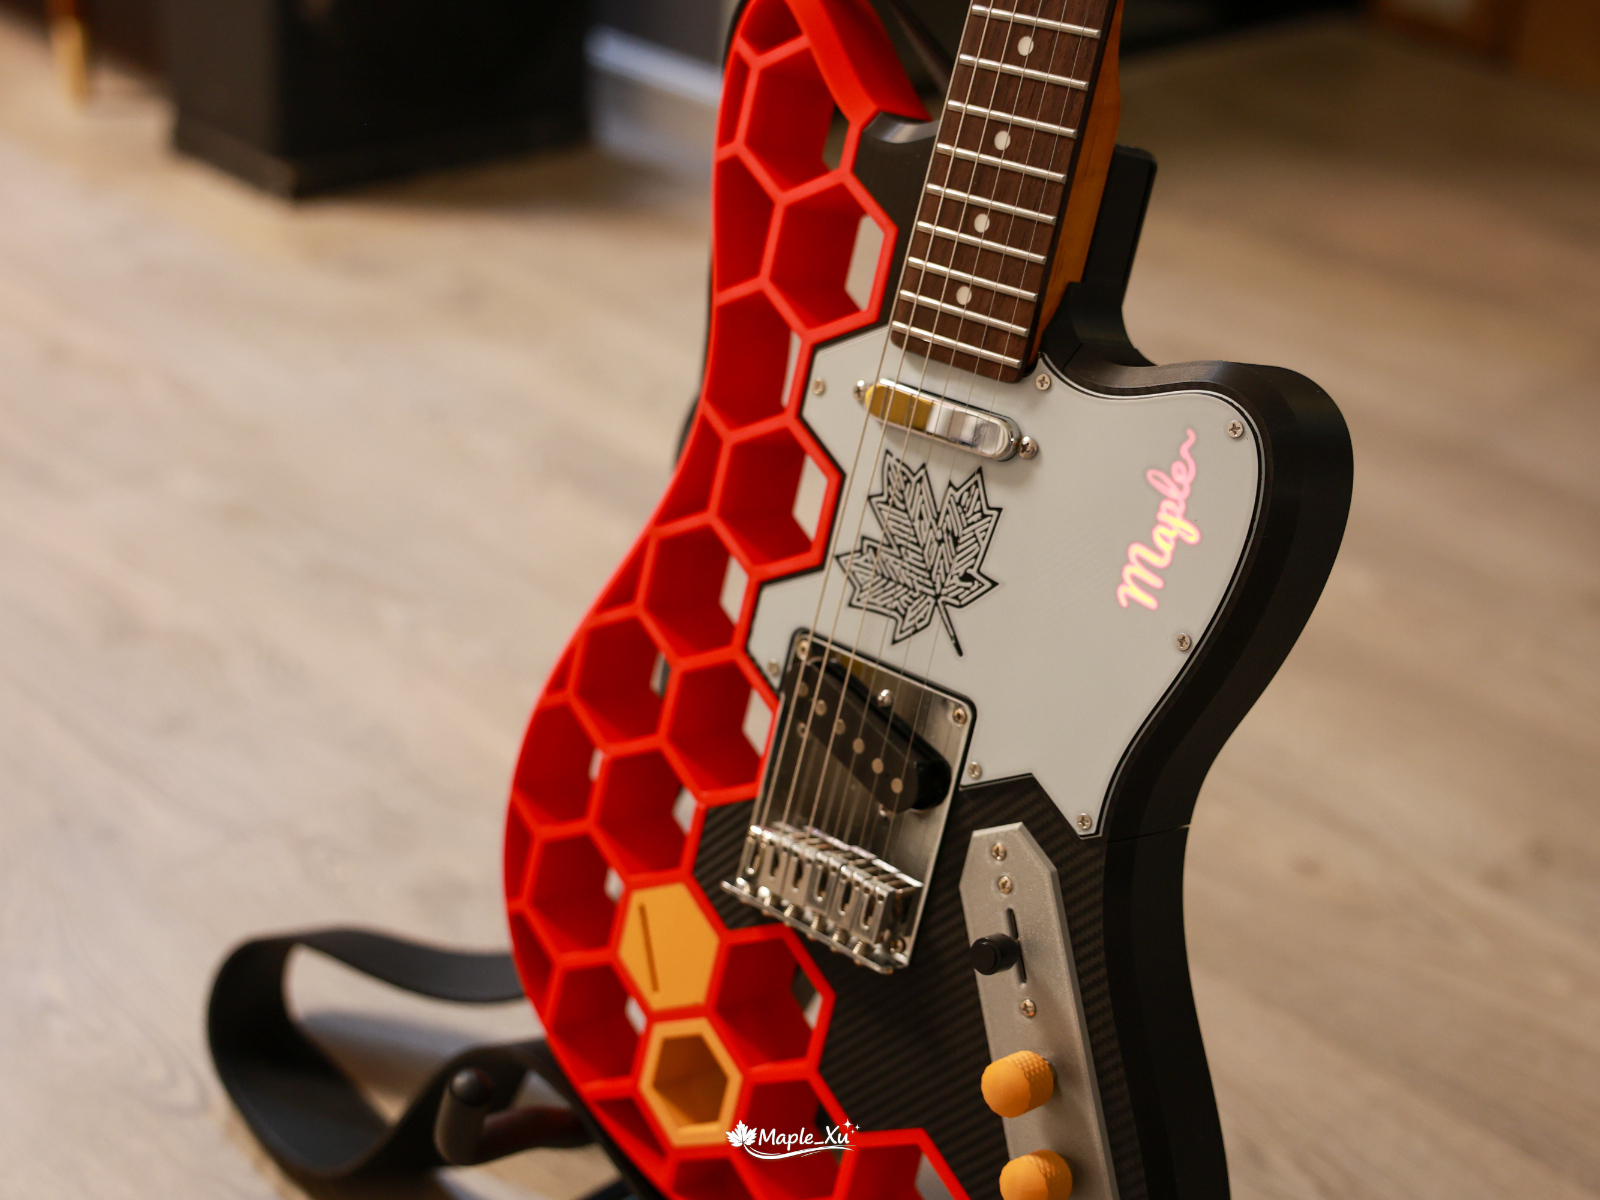
Color Scheme Design: Red, White, and Black as the Main Palette, Yellow as an Accent
This part took quite a while.
I’ve always been the indecisive type. My artistic instincts are fairly limited, and I often struggle to visualize how a finished project will actually look. I dragged a few friends into the process and collected plenty of opinions along the way. AI image generation turned out to be a huge help, although I quickly discovered that several mainstream models tend to forget previously established constraints after multiple rounds of generation. (A quick search later revealed that this is apparently a common problem.)
The red honeycomb section paired with a white pickguard was decided on very early. I also planned to use a black-and-carbon-fiber combination for the lower body. The upper shoulder section, however, became a source of endless debate. I kept going back and forth on whether it should match the upper body, and whether it should share the same color as the neck. Since the neck had not arrived yet, I spent ages comparing color codes and trying to imagine how everything would look together. As it turned out, the PLA WOOD ochre-yellow filament I eventually purchased ended up being surprisingly close to what I had envisioned. After weighing factors such as aesthetics and structural strength, I finally settled on a primary palette of red, white, and black, with yellow serving as an accent color.
Looking at the finished guitar now, I think it was absolutely the right decision. Three main colors are already plenty—adding more would have pushed the design into toy-like territory.


Pickguard Artwork + LED Design

The artwork was initially generated using Gemini. Once the image was converted into an SVG file, it could be imported into the slicer software and used as a printable part.
The biggest hurdle was the conversion process. I tried countless websites—most either required payment or simply failed to produce a usable result. In the end, the only solution that worked reliably was an open-source project I found on GitHub. I also had to tweak the print settings several times before preventing the finer sections from sticking too aggressively to the build plate and peeling off during removal. In total, I ended up printing three extra pickguards.
The pickguard itself contains a small hidden detail: it has a subtle starburst shimmer effect when it catches the light, although my camera failed to capture it properly. For the illuminated lettering, I asked AI to recommend a script font and ended up using Pacifico, which turned out great. The only minor flaw is that, in order to avoid the charging port, I had to leave a small gap in the LED strip. As a result, the top portion of the lettering is slightly dimmer than the rest. In hindsight, shifting the text a little lower would probably have produced a more balanced result. To make the pickguard translucent, additional slicer settings were required as well, including separate layer printing for the black middle section. The original designer provided instructions for this process, but the tricky part ended up being the math involved.
LED Circuit and Switch Installation: The Most Frustrating Part of the Entire Build
Without question, this was the part that drove me the craziest—and it consumed a considerable amount of time. Since it involved soldering circuitry and wiring switches, I had to learn basic electronics from scratch. The circuit itself was probably quite simple, but when you start with zero experience, even simple things require a lot of studying. I have to admit that AI and the internet made it possible to gain at least a working understanding of a field that was completely unfamiliar to me.

The constant rework was especially discouraging. The first time around, I genuinely thought I had succeeded, only to discover that I had assembled the components in the wrong order. During the re-soldering process, I accidentally created a short circuit, burned through some wiring, and very nearly damaged the printed parts as well. Thankfully, I caught the problem in time and managed to save everything before any major damage occurred. At the time, I even wrote a postmortem analyzing what had gone wrong. Fortunately, the second attempt went perfectly.


Printing and Assembly Notes
There was nothing particularly unusual about the printing process itself, aside from modifying the model to suit my own preferences. The only notable change I made was flipping the bottom surface of the upper shoulder piece so that its finish would better match the rest of the guitar body. Another first-time experience was using transfer-texture build plates, including carbon-fiber and starlight-pattern finishes. One thing worth noting is that these plates generally provide weaker adhesion than PEI surfaces, so you may need to apply glue or thoroughly clean the plate when necessary.
Assembly Order
Body assembly → LED circuitry → Pickup and electronics assembly → Bridge → Neck → Strings → Small hardware (strap buttons, string tree, etc.)
Key Things to Watch Out For
- Make absolutely sure to line the inside of the body cavity with copper foil shielding. After applying it, use a multimeter to verify electrical continuity. Otherwise, your Faraday cage won’t actually function—and that can lead to all sorts of fun noise problems.
- I also strongly recommend testing the electronics before installing the pickguard and neck. Once the wiring is complete, connect everything and tap the pickup poles with a screwdriver to confirm the circuit is working correctly. Check that the volume and tone controls function as intended. Only proceed with the remaining assembly after you’ve confirmed everything is working perfectly. Trust me—it’s much better than having to tear the whole thing apart and start over.
These tips may sound simple, but every one of them was learned through repeated mistakes and rework. At one point I genuinely began to question whether I had any talent whatsoever for mechanical projects.
LED Charging Port

The original model was designed around a lithium battery charging board that is commonly used overseas. I replaced it with a smaller component sourced from Taobao, which created a whole new set of challenges. As a result, I spent a ridiculous amount of time adjusting the size of the charging-port opening. After several iterations, I enlarged the hole using negative modifiers in the slicer software, then finally solved the fitment issue with a combination of a hot-glue gun and an additional custom-printed spacer.
As for why I didn’t simply print the correct dimensions from the start—the answer is that I originally purchased a female connector that would allow the battery to be charged directly. Later on, however, that connector ended up being completely unnecessary. The full story is tied to my first failed attempt at soldering the LED circuitry. One thing I would do differently next time is use more hot glue. Since it was my first time working with a glue gun, I was overly cautious and didn’t apply nearly as much as I probably should have.
String Tree Installation on the Headstock

After doing some research and studying reference photos, I determined that the classic 1960s Telecaster placement for a string tree is near the tuner for the fifth string. There are also configurations that use two string trees. One of the pitfalls I ran into here was not having a 2.0mm drill bit on hand at the beginning. Since I would also need it later for securing the tuning machines, I ended up rushing an emergency same-day delivery order. Another thing worth noting: if you plan to apply a decal to the headstock, it’s probably best to do that before drilling any holes.
While we’re on the subject of drilling, here’s a small detail that might save someone else some trouble: clockwise is for drilling in, counterclockwise is for backing out. I actually managed to get that backwards on one or two holes. According to AI, drilling in reverse can slightly affect the structural integrity of the hole. Fortunately, the impact was minimal in my case. It was simply one of those beginner mistakes that comes from working with unfamiliar tools for the first time. With a bit more experience, it’s the sort of thing that should be easy to avoid in the future.
Potentiometer Assembly

This assembly’s button situation was both frustrating and oddly amusing.
The original creator barely mentioned anything about the LED-related setup and didn’t provide any photos, so at first I had absolutely no idea where the switch was supposed to go. Later, while browsing MakerWorld, I found plenty of other folks overseas who were just as confused as I was. In one of the replies, the creator finally clarified it—the switch was meant to be mounted on the assembly’s metal plate.
But that created another problem: the assembly I originally bought was higher quality, but it was difficult to disassemble, and drilling into the metal plate wasn’t exactly practical. In the end, I had to replace it with a cheaper assembly that was easier to take apart before everything fit perfectly (another +2 days added to the project timeline). The printed plastic button doesn’t feel quite as good as the original metal one, but for the sake of keeping the color scheme consistent, I had to sacrifice a bit of tactile feel.
Rear Neck Installation

I originally thought this would be the hardest step of the entire build, but in reality, drilling the neck mounting holes wasn’t nearly as difficult as I had imagined. First, I secured the neck in place and used self-tapping screws to leave guide marks, then marked the positions with a marker before drilling. Later, when installing the strings, I thought I had mounted the neck incorrectly and ended up removing and reinstalling it. That left a few small cracks around the edges of the holes, though that’s fairly normal.
Looking back, I’m glad I didn’t print the right-side shoulder section in a different color. Otherwise, the back of the guitar might have ended up looking a little strange.
Bridge + Two Pickups

These two components also brought their fair share of trouble. I bought discounted Korean-made parts. The first bridge pickup the seller sent arrived with rusty pole pieces. After they sent a replacement, a few days later, when I was installing the neck pickup, I realized I simply couldn’t get the screws to go in. It turned out the screw holes provided by the seller were slightly smaller in diameter. To the seller’s credit, they immediately refunded me. Faced with the choice of buying a new one or gambling on the possibility that a different screw might work, I chose the latter. Fortunately, M4×12 screws came through as hoped—though the project timeline was delayed by another two days.
So I’d still recommend spending a little more on higher-quality domestic products. Also, make sure to verify that the bridge mounting holes match your guitar body model. At the time, I roughly compared them using a template and thought everything looked fine, but during installation I found the fit was a bit cramped. Another thing to remember is to route the ground wire from the assembly underneath the bridge for grounding. And definitely install the neck pickup before installing the bridge—don’t ask me how I know.
Guitar Strap Buttons

Installing these was actually one of the final steps of the whole build, but I still lacked some basic knowledge. For example, I didn’t initially understand how the button mounting hardware was supposed to work. Surprisingly, the product page didn’t include any diagrams. In the end, I had to ask the seller for help, and they sent me a screenshot from another store’s listing before I finally understood it. Based on my needs, I replaced the included self-tapping screws (which were presumably intended for wooden guitar bodies) with M4×16 screws and nuts. At the same time, I also couldn’t figure out how to thread the strap correctly at first. Unfortunately, anything involving straps and buckles has always been a weak point for me. Thankfully, all of these little issues were eventually resolved. One hurdle after another—but each one got cleared in the end.
String Installation + Setup + Playing
From this point on, anyone with guitar experience can probably stop reading. The mistakes I ran into were almost entirely the result of having absolutely no prior experience.
The first time I installed the strings, I accidentally snapped the B string… Later I learned that it’s actually a good idea to keep a few spare high E and B strings on hand. One useful tip I picked up from a video was to leave roughly the length of two tuning pegs’ spacing of slack before winding each string, while making sure the wraps spiral downward around the post. This creates a more secure winding.
After watching a lot of videos, I felt that very few of them fully explained the proper setup order for an electric guitar. After piecing everything together, this is the sequence I came up with:
Neck relief → String action (bridge height) → Open-string tuning → Intonation (bridge saddle position) → Pickup height
The Guitar Tuner app on my phone wasn’t able to accurately detect intonation adjustments, so I eventually had to buy a dedicated physical tuner. While researching further, I also discovered that the most cost-effective solution was to get an external audio interface, so I ended up buying a Focusrite 2i2 as well.
Typical setup: Guitar + Effects Pedal + Amplifier + Computer
Budget setup: Guitar + Software Effects + Audio Interface + Computer/Speakers
On Windows, you’ll need an ASIO driver that can work with both your speakers and the external audio interface.
At this point, all the “preparation work” can be considered complete. Now it’s finally time to start learning the guitar. And perhaps that’s where the hardest part really begins. 😀
Conclusion
Looking back, this 570 RMB would probably only be enough to buy a decent guitar neck in today’s instrument market. But for me, it turned into a complete electric guitar, a pile of soldering experience, a few late-night rework sessions, and that wonderful feeling of pressing down a string and thinking, “I made this sound myself.”
Of course, it’s far from perfect—the lighting at the top of the pickguard is a bit dim, there are small cracks around the neck mounting holes, and the potentiometer’s feel ended up being a compromise. But it’s precisely those imperfections that give this guitar its unique character. It’s not a master craftsman’s masterpiece; it’s something I spent 20 days building with my own hands, after falling into countless pitfalls along the way.
Sometimes, finishing something is more important than making it perfect.
Now it rests quietly in the corner of the room, fully strung and tuned, with the LED strip glowing faintly in the dark. I know I still have a long way to go before I can play a song well, but at least I already have a pretty cool starting point.
As for a sound demo—I’ll definitely add one once I can finally play a proper riff.

Leave a Reply