Category: 3D-Printed

  • DIY 3D-Printed Electric Guitar: Building a Fully Functional Guitar for Under $85

    DIY 3D-Printed Electric Guitar: Building a Fully Functional Guitar for Under $85

    Around my birthday, a certain brand’s “stringless guitar” went on sale, and I almost bought one as a gift for myself. But after thinking it over, I realized that while the concept and form factor were appealing—especially for complete beginners or people focused on singing and accompaniment—it still wasn’t really a true musical instrument.

    That thought, however, led me in a different direction: if even entry-level electric guitars cost well over a thousand yuan, and there are already ready-made 3D-printable models online, why not just build one myself?

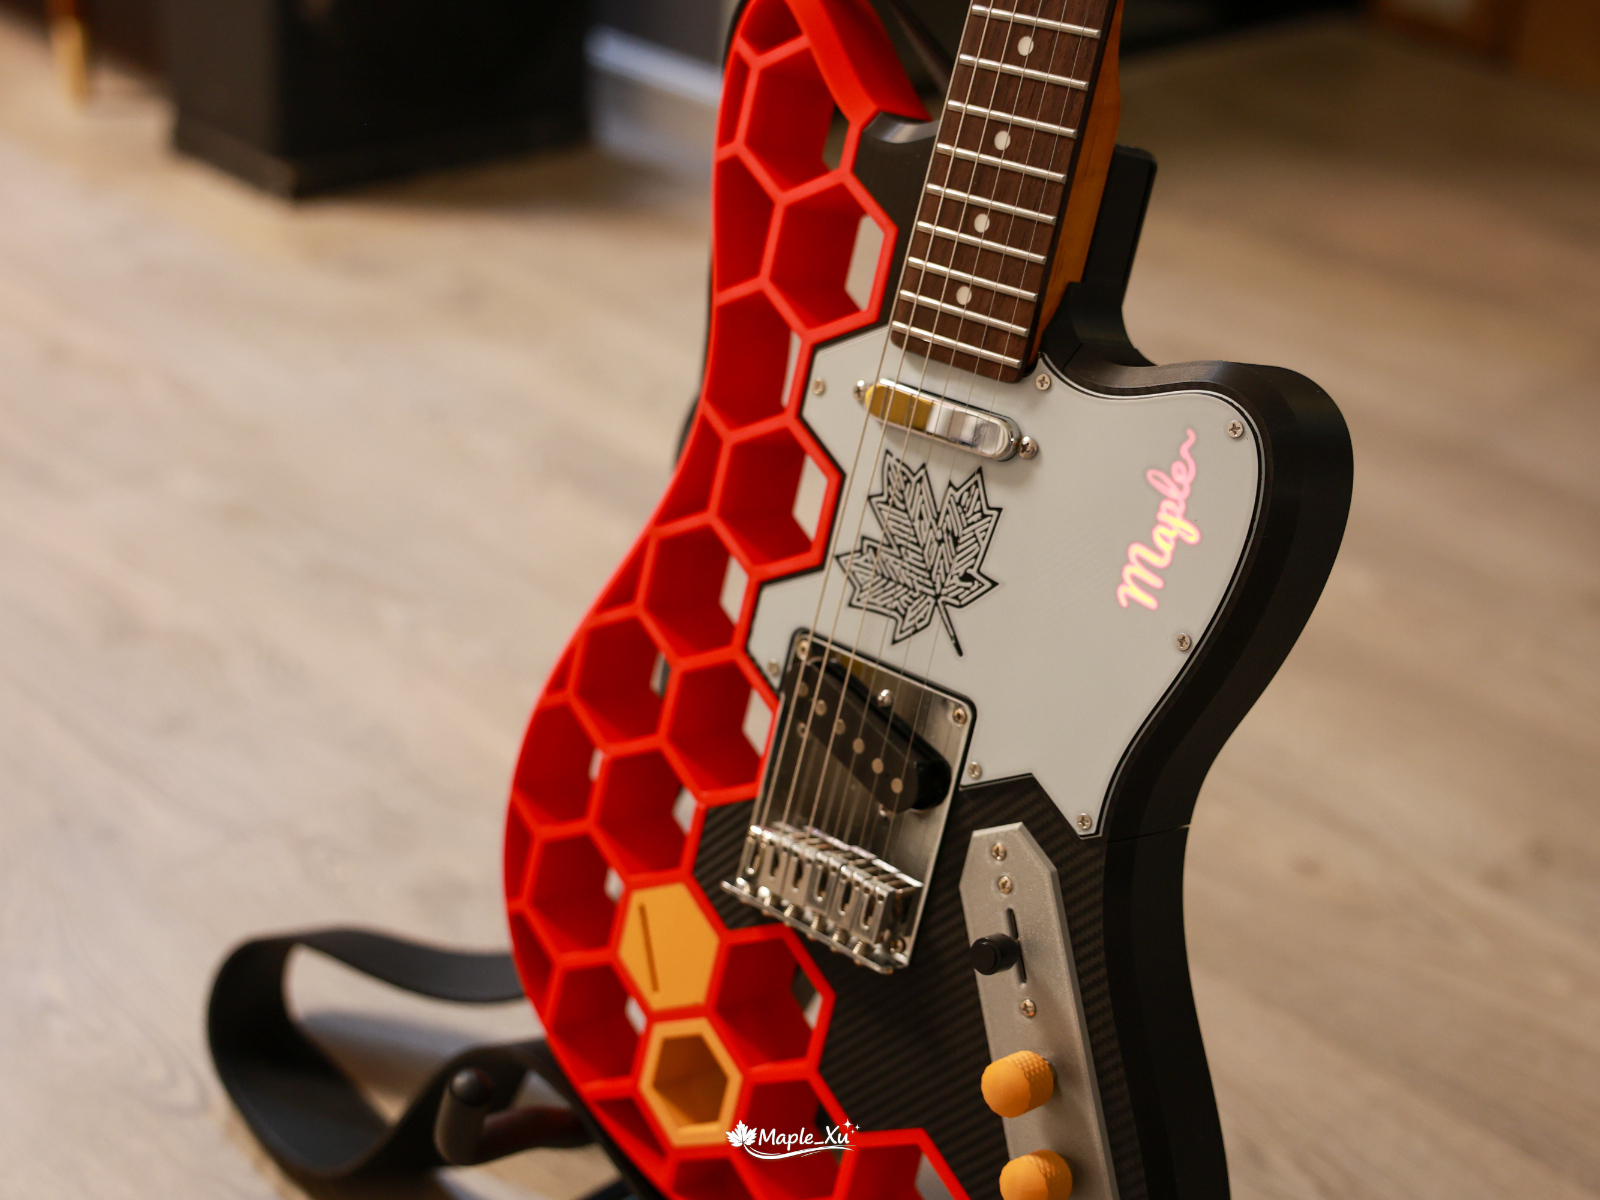
    You always have to start with a few glamour shots of the finished product to grab everyone’s attention 📸

    And so began a 20-day project (including the May Day holiday) full of trial and error. Starting from scratch, I learned how to solder, repeatedly reworked parts, burned through wires, snapped guitar strings… and eventually ended up with a fully playable electric guitar that cost only RMB 570 to build. This article documents the entire journey, including the lessons learned and pitfalls encountered along the way. Hopefully it can serve as a useful reference for anyone interested in trying something similar.

    The “teaser” I posted on social media earlier—the snapped second string 💥 was actually edited in using GPT-image 🤖.

    Project Overview: From Model to Finished Instrument

    Overall Build Process

    Choose the model → Select materials → Purchase parts and components → Decide on the color scheme → Design the pickguard graphics and LED effects → Plan the LED circuitry and switch placement → Print → Assemble → Tune and test

    Materials and Total Cost

    ItemCost
    2 kg of PLA filamentRMB 100
    Roasted maple neckRMB 165
    Pickup + bridgeRMB 55
    Pre-wired potentiometer assemblyRMB 30
    Ernie Ball guitar stringsRMB 35
    LED-related components (Li-ion charging board, battery, switches, etc.)RMB 20
    Carbon-fiber reinforcement rodsRMB 50
    Miscellaneous hardware (string tree, strap buttons, output jack, etc.)RMB 100
    TotalRMB 570

    Choosing the Model: Why I Went with the Bambucaster

    After narrowing things down, I ended up with two candidate models:

    1. Bambucaster Electric Guitar – Free 3D Printable Model – MakerWorld (Telecaster-style body)
    2. Fishcaster-Lite – Built-in Speaker Playable Electric Guitar – Free 3D Printable Model – MakerWorld (Built-in speaker, Stratocaster-style body)

    After carefully weighing the options, I ultimately chose the first model. Although the second model was created by a Chinese designer, featured a beginner-friendly Stratocaster-style body, and even included a built-in speaker, I felt it might introduce additional complexity for a first-time build. On top of that, I simply preferred the look of a Telecaster-style body, which sealed the decision.

    The quality of the Bambucaster model is genuinely impressive. It is based on the Prusacaster—a design inspired by Prusa, the well-known 3D printer manufacturer—and there are even professionally produced build videos available on YouTube. The model includes a number of thoughtful improvements, such as heat-set threaded inserts for securing the body, slots for reinforcement rods to improve structural strength, and a rather eye-catching LED lighting system.

    The only downside is that the original creator’s documentation is extremely concise. Looking back after completing the build, I can see that every point they mentioned was important. However, because I lacked some fundamental knowledge—both about electric guitars themselves and about electronics soldering—I ran into quite a few obstacles along the way. At one point I was even joking to friends that the instructions felt a little too “free-spirited” and assumed far more prior knowledge than a beginner would realistically have.

    Material Selection: PLA Is Actually a Better Choice Than PETG

    The materials discussed here mainly refer to the guitar body. The honeycomb section, the upper shoulder piece, and the pickguard do not appear to have particularly strict material requirements.

    Most people would naturally assume that PETG is the stronger option. However, after taking a closer look at the Prusacaster blog, I discovered that what the guitar body actually needs is a material with greater stiffness to resist the tension of the strings. Somewhat surprisingly, the recommended choice is PLA. Of course, if you have access to them, PLA-CF or ABS would likely be even better options.

    Since the body design incorporates reinforcement rods, my understanding was that standard PLA Basic would be perfectly adequate. The original designer used 8mm carbon tubes for reinforcement, but I opted for solid carbon rods instead. They feel more robust and sturdy, although inserting them requires a bit more effort. Cheaper hardened steel rods or linear shafts would probably work as well.

    Source: https://blog.prusa3d.com/the-prusacaster-how-to-design-and-3d-print-an-electric-guitar_71962/

    Buying the Parts: Skip the Kit, Source Components Individually for More Flexibility

    The original model creator purchased a Harley Benton hardware kit from an overseas retailer. There are similar kits available on Chinese e-commerce platforms for around RMB 200, but after taking a look, I felt some of the components seemed rather rough and basic. After doing a bit more research, I realized that buying a kit is completely unnecessary—we don’t actually need the body or the pickguard included in those kits, since both will be 3D printed anyway.

    • Main Components: Neck, pickup, bridge, and electronics assembly (standard Telecaster-spec parts work perfectly fine)
    • Additional Components: String tree, strap buttons, output jack, and LED-related parts
    • LED Components: Lithium battery charging board, 1850B lithium battery, battery holder, three-pin two-position toggle switch, wiring, and bare-board LED strip
    I’m extremely happy with the roasted maple neck I purchased. When it arrived, the finish looked absolutely gorgeous under the warm glow of the evening sun 🌇.

    Color Scheme Design: Red, White, and Black as the Main Palette, Yellow as an Accent

    This part took quite a while.

    I’ve always been the indecisive type. My artistic instincts are fairly limited, and I often struggle to visualize how a finished project will actually look. I dragged a few friends into the process and collected plenty of opinions along the way. AI image generation turned out to be a huge help, although I quickly discovered that several mainstream models tend to forget previously established constraints after multiple rounds of generation. (A quick search later revealed that this is apparently a common problem.)

    The red honeycomb section paired with a white pickguard was decided on very early. I also planned to use a black-and-carbon-fiber combination for the lower body. The upper shoulder section, however, became a source of endless debate. I kept going back and forth on whether it should match the upper body, and whether it should share the same color as the neck. Since the neck had not arrived yet, I spent ages comparing color codes and trying to imagine how everything would look together. As it turned out, the PLA WOOD ochre-yellow filament I eventually purchased ended up being surprisingly close to what I had envisioned. After weighing factors such as aesthetics and structural strength, I finally settled on a primary palette of red, white, and black, with yellow serving as an accent color.

    Looking at the finished guitar now, I think it was absolutely the right decision. Three main colors are already plenty—adding more would have pushed the design into toy-like territory.

    Back then, when I had Gemini generate various options, I’d always remember one line but forget the one before it 😅, which ended up wasting quite a bit of my budget 💸.

    Pickguard Artwork + LED Design

    The artwork was initially generated using Gemini. Once the image was converted into an SVG file, it could be imported into the slicer software and used as a printable part.

    The biggest hurdle was the conversion process. I tried countless websites—most either required payment or simply failed to produce a usable result. In the end, the only solution that worked reliably was an open-source project I found on GitHub. I also had to tweak the print settings several times before preventing the finer sections from sticking too aggressively to the build plate and peeling off during removal. In total, I ended up printing three extra pickguards.

    The pickguard itself contains a small hidden detail: it has a subtle starburst shimmer effect when it catches the light, although my camera failed to capture it properly. For the illuminated lettering, I asked AI to recommend a script font and ended up using Pacifico, which turned out great. The only minor flaw is that, in order to avoid the charging port, I had to leave a small gap in the LED strip. As a result, the top portion of the lettering is slightly dimmer than the rest. In hindsight, shifting the text a little lower would probably have produced a more balanced result. To make the pickguard translucent, additional slicer settings were required as well, including separate layer printing for the black middle section. The original designer provided instructions for this process, but the tricky part ended up being the math involved.

    LED Circuit and Switch Installation: The Most Frustrating Part of the Entire Build

    Without question, this was the part that drove me the craziest—and it consumed a considerable amount of time. Since it involved soldering circuitry and wiring switches, I had to learn basic electronics from scratch. The circuit itself was probably quite simple, but when you start with zero experience, even simple things require a lot of studying. I have to admit that AI and the internet made it possible to gain at least a working understanding of a field that was completely unfamiliar to me.

    The constant rework was especially discouraging. The first time around, I genuinely thought I had succeeded, only to discover that I had assembled the components in the wrong order. During the re-soldering process, I accidentally created a short circuit, burned through some wiring, and very nearly damaged the printed parts as well. Thankfully, I caught the problem in time and managed to save everything before any major damage occurred. At the time, I even wrote a postmortem analyzing what had gone wrong. Fortunately, the second attempt went perfectly.

    First attempt: complete disaster 😔 + lessons learned the hard way 💪
    When the LEDs finally lit up successfully, though, the sense of accomplishment was absolutely off the charts ✨.

    Printing and Assembly Notes

    There was nothing particularly unusual about the printing process itself, aside from modifying the model to suit my own preferences. The only notable change I made was flipping the bottom surface of the upper shoulder piece so that its finish would better match the rest of the guitar body. Another first-time experience was using transfer-texture build plates, including carbon-fiber and starlight-pattern finishes. One thing worth noting is that these plates generally provide weaker adhesion than PEI surfaces, so you may need to apply glue or thoroughly clean the plate when necessary.

    Assembly Order

    Body assembly → LED circuitry → Pickup and electronics assembly → Bridge → Neck → Strings → Small hardware (strap buttons, string tree, etc.)

    Key Things to Watch Out For

    • Make absolutely sure to line the inside of the body cavity with copper foil shielding. After applying it, use a multimeter to verify electrical continuity. Otherwise, your Faraday cage won’t actually function—and that can lead to all sorts of fun noise problems.
    • I also strongly recommend testing the electronics before installing the pickguard and neck. Once the wiring is complete, connect everything and tap the pickup poles with a screwdriver to confirm the circuit is working correctly. Check that the volume and tone controls function as intended. Only proceed with the remaining assembly after you’ve confirmed everything is working perfectly. Trust me—it’s much better than having to tear the whole thing apart and start over.

    These tips may sound simple, but every one of them was learned through repeated mistakes and rework. At one point I genuinely began to question whether I had any talent whatsoever for mechanical projects.

    LED Charging Port

    The original model was designed around a lithium battery charging board that is commonly used overseas. I replaced it with a smaller component sourced from Taobao, which created a whole new set of challenges. As a result, I spent a ridiculous amount of time adjusting the size of the charging-port opening. After several iterations, I enlarged the hole using negative modifiers in the slicer software, then finally solved the fitment issue with a combination of a hot-glue gun and an additional custom-printed spacer.

    As for why I didn’t simply print the correct dimensions from the start—the answer is that I originally purchased a female connector that would allow the battery to be charged directly. Later on, however, that connector ended up being completely unnecessary. The full story is tied to my first failed attempt at soldering the LED circuitry. One thing I would do differently next time is use more hot glue. Since it was my first time working with a glue gun, I was overly cautious and didn’t apply nearly as much as I probably should have.

    String Tree Installation on the Headstock

    After doing some research and studying reference photos, I determined that the classic 1960s Telecaster placement for a string tree is near the tuner for the fifth string. There are also configurations that use two string trees. One of the pitfalls I ran into here was not having a 2.0mm drill bit on hand at the beginning. Since I would also need it later for securing the tuning machines, I ended up rushing an emergency same-day delivery order. Another thing worth noting: if you plan to apply a decal to the headstock, it’s probably best to do that before drilling any holes.

    While we’re on the subject of drilling, here’s a small detail that might save someone else some trouble: clockwise is for drilling in, counterclockwise is for backing out. I actually managed to get that backwards on one or two holes. According to AI, drilling in reverse can slightly affect the structural integrity of the hole. Fortunately, the impact was minimal in my case. It was simply one of those beginner mistakes that comes from working with unfamiliar tools for the first time. With a bit more experience, it’s the sort of thing that should be easy to avoid in the future.

    Potentiometer Assembly

    This assembly’s button situation was both frustrating and oddly amusing.

    The original creator barely mentioned anything about the LED-related setup and didn’t provide any photos, so at first I had absolutely no idea where the switch was supposed to go. Later, while browsing MakerWorld, I found plenty of other folks overseas who were just as confused as I was. In one of the replies, the creator finally clarified it—the switch was meant to be mounted on the assembly’s metal plate.

    But that created another problem: the assembly I originally bought was higher quality, but it was difficult to disassemble, and drilling into the metal plate wasn’t exactly practical. In the end, I had to replace it with a cheaper assembly that was easier to take apart before everything fit perfectly (another +2 days added to the project timeline). The printed plastic button doesn’t feel quite as good as the original metal one, but for the sake of keeping the color scheme consistent, I had to sacrifice a bit of tactile feel.

    Rear Neck Installation

    I originally thought this would be the hardest step of the entire build, but in reality, drilling the neck mounting holes wasn’t nearly as difficult as I had imagined. First, I secured the neck in place and used self-tapping screws to leave guide marks, then marked the positions with a marker before drilling. Later, when installing the strings, I thought I had mounted the neck incorrectly and ended up removing and reinstalling it. That left a few small cracks around the edges of the holes, though that’s fairly normal.

    Looking back, I’m glad I didn’t print the right-side shoulder section in a different color. Otherwise, the back of the guitar might have ended up looking a little strange.

    Bridge + Two Pickups

    These two components also brought their fair share of trouble. I bought discounted Korean-made parts. The first bridge pickup the seller sent arrived with rusty pole pieces. After they sent a replacement, a few days later, when I was installing the neck pickup, I realized I simply couldn’t get the screws to go in. It turned out the screw holes provided by the seller were slightly smaller in diameter. To the seller’s credit, they immediately refunded me. Faced with the choice of buying a new one or gambling on the possibility that a different screw might work, I chose the latter. Fortunately, M4×12 screws came through as hoped—though the project timeline was delayed by another two days.

    So I’d still recommend spending a little more on higher-quality domestic products. Also, make sure to verify that the bridge mounting holes match your guitar body model. At the time, I roughly compared them using a template and thought everything looked fine, but during installation I found the fit was a bit cramped. Another thing to remember is to route the ground wire from the assembly underneath the bridge for grounding. And definitely install the neck pickup before installing the bridge—don’t ask me how I know.

    Guitar Strap Buttons

    Installing these was actually one of the final steps of the whole build, but I still lacked some basic knowledge. For example, I didn’t initially understand how the button mounting hardware was supposed to work. Surprisingly, the product page didn’t include any diagrams. In the end, I had to ask the seller for help, and they sent me a screenshot from another store’s listing before I finally understood it. Based on my needs, I replaced the included self-tapping screws (which were presumably intended for wooden guitar bodies) with M4×16 screws and nuts. At the same time, I also couldn’t figure out how to thread the strap correctly at first. Unfortunately, anything involving straps and buckles has always been a weak point for me. Thankfully, all of these little issues were eventually resolved. One hurdle after another—but each one got cleared in the end.

    String Installation + Setup + Playing

    From this point on, anyone with guitar experience can probably stop reading. The mistakes I ran into were almost entirely the result of having absolutely no prior experience.

    The first time I installed the strings, I accidentally snapped the B string… Later I learned that it’s actually a good idea to keep a few spare high E and B strings on hand. One useful tip I picked up from a video was to leave roughly the length of two tuning pegs’ spacing of slack before winding each string, while making sure the wraps spiral downward around the post. This creates a more secure winding.

    After watching a lot of videos, I felt that very few of them fully explained the proper setup order for an electric guitar. After piecing everything together, this is the sequence I came up with:

    Neck relief → String action (bridge height) → Open-string tuning → Intonation (bridge saddle position) → Pickup height

    The Guitar Tuner app on my phone wasn’t able to accurately detect intonation adjustments, so I eventually had to buy a dedicated physical tuner. While researching further, I also discovered that the most cost-effective solution was to get an external audio interface, so I ended up buying a Focusrite 2i2 as well.

    Typical setup: Guitar + Effects Pedal + Amplifier + Computer

    Budget setup: Guitar + Software Effects + Audio Interface + Computer/Speakers

    On Windows, you’ll need an ASIO driver that can work with both your speakers and the external audio interface.

    At this point, all the “preparation work” can be considered complete. Now it’s finally time to start learning the guitar. And perhaps that’s where the hardest part really begins. 😀

    Conclusion

    Looking back, this 570 RMB would probably only be enough to buy a decent guitar neck in today’s instrument market. But for me, it turned into a complete electric guitar, a pile of soldering experience, a few late-night rework sessions, and that wonderful feeling of pressing down a string and thinking, “I made this sound myself.”

    Of course, it’s far from perfect—the lighting at the top of the pickguard is a bit dim, there are small cracks around the neck mounting holes, and the potentiometer’s feel ended up being a compromise. But it’s precisely those imperfections that give this guitar its unique character. It’s not a master craftsman’s masterpiece; it’s something I spent 20 days building with my own hands, after falling into countless pitfalls along the way.

    Sometimes, finishing something is more important than making it perfect.

    Now it rests quietly in the corner of the room, fully strung and tuned, with the LED strip glowing faintly in the dark. I know I still have a long way to go before I can play a song well, but at least I already have a pretty cool starting point.

    As for a sound demo—I’ll definitely add one once I can finally play a proper riff.

    It seems that Summer 🐱 still needs a bit more time to get used to the new member of the household.
  • What Editors Are Buying: New Stuff Vol. 241

    What Editors Are Buying: New Stuff Vol. 241

    @张奕源 Nick

    Mianxiaoniu Pure Cotton T-Shirts

    • Reference Price: ¥18

    Friends, I’ve finally found the ultimate cheap-and-good T-shirt.

    A while ago, I got rid of a bunch of T-shirts that I’d been wearing for years or that had already lost their shape, so naturally I needed to restock. During my search, I came across this store. Originally, I was buying their shirts with the mindset of them being disposable basics — something you wear a couple of times and toss away. But the quality turned out to be surprisingly good, far beyond my expectations, so I absolutely have to rave about them in this edition of New Stuff.

    Their T-shirts use a very standard, versatile cut, and even the 320g version already feels quite thick and substantial while still being soft and comfortable to wear. I bought several colors including Klein blue, forest green, navy, and gray, and every single one looks vibrant and well-saturated rather than cheap. What’s even more impressive is that despite being heavyweight pure cotton shirts, they barely shrank after washing and don’t noticeably fade. In terms of quality, I genuinely have no complaints. At first I was planning to try their 400g version too, but after wearing the 320g one, I realized there was really no need — it’s already soft enough while still feeling durable.

    The gray version looks like this.

    Another advantage of these blank-style T-shirts is that the fit is basically unisex. Personally, I prefer wearing oversized clothes, so I bought one size larger than the store recommended. Considering how cheap these shirts are, even if you don’t wear them outside, buying a few oversized ones as sleepwear at home is honestly not a bad idea.

    The colors from this store are all lively and vibrant without looking tacky at first glance. It feels like they’ve actually done market research and understand younger people’s preferences. Their main product is clearly these blank T-shirts, though they also sell sweatshirts, hoodies, and similar basics. The whole store really does look like a factory-direct operation. It’s a shame they don’t sell athletic pants, otherwise I’d probably stock up on several pairs too — definitely more reliable than randomly buying from different stores and platforms.

    Another benefit of the low price is that if you’re traveling, you can buy several shirts in different colors and wear a different one every day. It would probably make vacation photos more fun too.

    Given how developed China’s apparel manufacturing industry is these days, there are probably tons of similar stores on e-commerce platforms. I’ll leave a link here so you can jump directly to it, though you can also expand your search based on your own preferences. In any case, from a practical standpoint, these cheap, simple white-label T-shirts are already surprisingly comfortable to wear and are perfect for stocking up on ahead of summer.

    Bambu Lab X2D 3D Printer

    • Reference Price: ¥5099.15 (Multi-Color Printing Bundle)

    Good grief, Bambu Lab had barely finished launching the Bambu Lab P2S before the Bambu Lab X2D arrived. Even though my few months with 3D printing have been very much “lazy user” territory — I mostly just print models made by other people and almost never touch parameter tuning — I still brought the X2D home immediately.

    The overall design and performance of the X2D are not dramatically different from the P2S, and many parts are even interchangeable, so I won’t repeat the basic printing experience here. If you’re interested, you can check out the P2S write-up I previously shared in New Stuff:https://sspai.com/post/105458

    Compared with the P2S, the X2D mainly adds several key features. First, it now has two print nozzles: one primary nozzle and one auxiliary nozzle. To reduce the size and weight of the print head, only the primary nozzle is equipped with an extruder mounted directly on the head, while the auxiliary nozzle’s extruder becomes a separate external module. Under this “remote extrusion, close output” structure, the two nozzles have slightly different printing characteristics. The primary nozzle uses a servo motor for extrusion, while the auxiliary nozzle uses a stepper motor, meaning the primary nozzle supports a wider range of materials, offers finer detail control, and achieves higher printing efficiency.

    The external extruder mounted behind the X2D

    Secondly, the X2D adds an active chamber temperature control system, allowing it to print a wider range of engineering-grade materials. The machine now includes dual air intake ports, enabling chamber temperatures to rise and fall faster and more accurately than on the P2S. On top of that, the X2D also comes bundled with an external air purification module. This upgrade works alongside the chamber temperature system to reduce odors during high-temperature printing.

    The external air purification module — likely something P2S users can also buy separately

    So, you can basically think of the X2D as the Pro version of the P2S. It still handles everyday printing needs effortlessly, while also giving you room to experiment with industrial-grade materials and more product-oriented creative projects.

    From actual day-to-day use, I mainly noticed two things. First, dual-nozzle printing dramatically simplifies support structures. For example, my primary nozzle is connected to the AMS and prints only PLA, while the auxiliary nozzle is dedicated to PETG. This creates excellent separation between the support material and the main print, making supports incredibly easy to remove without carefully picking at them with tools for ages, which saves a ton of time and effort. Second, the active chamber temperature system noticeably improves print quality. I previously encountered warping issues at certain angles on some models when using the P2S, but those problems disappeared entirely on the X2D.

    One of Bambu Lab’s recommended setups is mixing PLA with PETG supports, which makes support removal extremely easy
    The detail quality is seriously impressive!

    Overall, if you want a 3D printer suitable for home use, the Bambu Lab X2D is already about as high-end as it gets. For users like me who mostly want to print finished products to solve practical daily-life problems, Bambu Lab’s biggest strengths remain the same: easy setup, reliable operation, and consistently solid print quality. For users who want to seriously explore 3D printing, run projects, or even start a print farm, the X2D’s performance is also strong enough to satisfy most needs and creative ambitions.

    Oh, and Bambu Lab recently introduced a new material called PLA Pure, which focuses on food-grade safety and can supposedly be used for items like tableware and children’s toys. This is actually a material I’ve been waiting for for a long time — I’ve wanted to print a food bowl for my cat for ages. I already received the new filament but haven’t started using it yet. If I have any thoughts after trying it out, I’ll write a follow-up later.

    @怡宝:OASEAR Witch Pro HiFi Earphones

    • Reference Price: ¥522

    A warm-toned anime-style IEM

    I originally approached this with a simple mindset: if I’m just buying something for commuting and casual listening, it at least has to look good. That’s how I ended up getting the OASEAR Witch Pro. Honestly, the first thing that caught my attention was the pink “Taoyao” model from the same lineup, but after debating for a while, I decided I wanted to try the upgraded “Witch” version instead.

    Appearance

    The “Witch Pro” uses a dark purple semi-transparent resin shell with a very smooth and refined texture. Comfort and lightweight design both deserve praise. Personally, I prefer integrated in-ear designs, and these didn’t cause any ear pressure even after wearing them continuously for two hours. I used the smallest included ear tips, and they still didn’t press against my relatively flat ear shape, so I’d say they’re friendly for people with smaller ears.

    Listening Experience

    Since these are clearly vocal-focused ACG earphones, I started testing them with 茜さす by Aimer. Aimer’s slightly husky voice pairs extremely well with the warm tuning of these earphones, fully conveying the sorrowful “crying voice” quality in her singing. The indescribable loneliness in the lyrics somehow gains an unusual sense of warmth and healing here. Once the strings enter, however, one limitation caused by the earphones’ resolving ability becomes more noticeable: the separation between instruments is not especially sharp, but in exchange, the overall presentation feels more enveloping and immersive.

    Next, I listened to 夜に駆ける by YOASOBI. The “Witch Pro” really shines with smaller arrangements and vocal-focused tracks. When things get busier, instrument separation starts struggling a bit, with bass and synth layers occasionally overlapping. The high-frequency extension is still fairly good though — violin overtones retain an airy feeling without sounding harsh, and most importantly, the vocals never get buried. Comparatively speaking, the “Witch Pro” feels much better suited for solo vocal and ethereal-style ACG tracks rather than extremely noisy electronic-heavy anime music.

    As someone with fairly broad music tastes but a preference for soul and R&B, I also listened to The Show Must Go On by Bruno Major. The balance between vocals and accompaniment was handled nicely, with soft drum hits and an intimate close-to-the-ear vocal presentation that fits the song’s emotional atmosphere of confronting regret.

    Other Notes

    The “Witch Pro” has an impedance of 20Ω and can easily be driven directly, though the volume output is surprisingly high, so I usually keep it at around half my normal listening volume.

    For daily use, I pair it with the Moondrop Dawn Pro dongle DAC from Moondrop connected to my phone. It supports both 3.5mm and 4.4mm outputs with dual decoding, and at a little over ¥200, the value for money is excellent.

    Final Thoughts

    The “Witch Pro” uses a hybrid configuration with one dynamic driver and one balanced armature driver. While the treble is not especially bright, the bass extension goes deep enough without becoming overwhelming. Its real strength lies in the midrange, which sounds smooth, warm, and delicate. Emotional expression in love songs comes through especially well, making it a great fit for listeners with broad music tastes. Overall, this is a warm, atmospheric, and airy pair of earphones that delivers a very “ASMR-like” listening experience.

    @巴斯: Decathlon TILT 120 folding bike

    • Reference price: ¥1299

    I recently picked up the Decathlon TILT 120 folding bike and have been riding it over the past few weekends. My takeaway: it may not be perfect, but at around the $200 price range, it’s probably the best value folding bike you can get—and one of the most suitable options for getting around the city.

    From placing the order to having it delivered, it only took a day and a half. The bike comes in a large box and requires almost no setup—just unfold it, lock the “joints,” and you’re ready to ride. It truly delivers on the promise of “buy and ride.” As a beginner cyclist, I dislike complicated assembly, and anything that delays getting out the door quickly drains my enthusiasm. This bike is incredibly easy to get started with, which is one of the main reasons I chose it. It uses a classic mid-fold design, and the process is very smooth:

    1. Release the hinge in the middle of the frame
    2. Fold down the handlebar
    3. Bring it together and secure it with the magnetic latch
    4. Go

    After trying it multiple times, I can confirm it’s easy to unfold within 30 seconds as advertised. Once folded, it fits easily into a car trunk or a corner of a café. Whether it’s short cross-city trips or a casual ride out for coffee, you don’t have to worry about theft, and it doesn’t take up much space at home either—very convenient for storage.

    As for the riding experience, despite its compact appearance, the bike weighs 14.5 kg. The high-carbon steel frame gives it a reassuring heft, making the ride more stable while also providing some shock absorption. Going over speed bumps doesn’t feel overly bumpy.

    The 560 mm handlebar width offers a comfortable reach for my arms. Although the TILT 120 sits at the entry-level end of folding bikes, it comes with a 6-speed gear system. It may not sound like much, but it’s more than enough for urban riding. I usually stay in gear 4 for flat roads, shift to gear 2 for uphill sections, and gear 6 when going downhill. Overall, the performance feels stable and gives me a strong sense of control and safety.

    So far, I’m very satisfied with it. I mainly wanted something for casual weekend rides, but it turns out to be suitable for many scenarios. If you’re tired of the hassle and cost of shared bikes, or fed up with crowded subway rides, you might want to give this kind of healthy and controllable way of getting around a try—the scenery along the way might just quietly heal your entire day.

  • SSPAI Morning Brief: Apple Unveils iPhone 17e and M4 iPad Air as Qualcomm Introduces Snapdragon Wear Elite

    SSPAI Morning Brief: Apple Unveils iPhone 17e and M4 iPad Air as Qualcomm Introduces Snapdragon Wear Elite

    Morning Brief

    1. Apple unveils iPhone 17e and M4-powered iPad Air
    2. Two updates from Motorola
    3. Lenovo announces multiple new products at MWC
    4. HONOR unveils several new products at MWC
    5. Qualcomm introduces the new Snapdragon Wear Elite
    6. iReader launches the iReader Tango 2 Pro e-ink reader
    7. Three updates from Alibaba’s Qwen
    8. Anker eufyMake E1 3D Texture UV Printer now available domestically
    9. Briefs worth a quick look

    Apple unveils iPhone 17e and M4-powered iPad Air

    On March 2, Apple announced two new products: the iPhone 17e and a new iPad Air powered by the M4 chip.

    The iPhone 17e features a 6.1-inch display with Ceramic Shield 2 and an aluminum frame. It is powered by the A19 chip with a 4-core GPU and the C1X modem, and supports eSIM. Compared with the C1 modem found in the iPhone 16e, the C1X delivers up to twice the speed. The device supports MagSafe, with wireless charging up to 15W, and offers up to 26 hours of video playback. The iPhone 17e starts at 256GB of storage and is available in black, white, and pink, with pricing starting at RMB 4,499. It will go on sale on March 11. Source

    The new iPad Air is equipped with the M4 chip (8-core CPU and 9-core GPU), with unified memory increased to 12GB. It is available in 11-inch and 13-inch sizes, and comes in Space Gray, Blue, Purple, and Starlight. Storage starts at 128GB, with pricing beginning at RMB 4,799. It will also go on sale on March 11. The new iPad Air adopts the N1 chip and C1X modem, and supports Wi-Fi 7, Bluetooth 6, and Thread connectivity. Source


    Two updates from Motorola

    Motorola Partners with GrapheneOS

    On March 2 at MWC 2026, Motorola announced a long-term partnership with GrapheneOS, aiming to bring advanced security technologies to everyday users. Through this collaboration, the two parties will work together to enhance smartphone security and explore future device compatibility with GrapheneOS. Motorola will collaborate with GrapheneOS in the coming months on software features, security enhancements, and related areas, with more details to be revealed as the partnership progresses. At present, Motorola has not disclosed which models will be compatible with or ship with GrapheneOS. Previously, GrapheneOS was only available on Google Pixel devices. Source

    Motorola Unveils the Razr Fold Horizontal Foldable

    At MWC 2026, Motorola introduced its first horizontally folding smartphone, the Razr Fold. The device is powered by the Snapdragon 8 Gen 5 processor, paired with 16GB of RAM and 512GB of storage, with a 1TB variant available in select markets. It features a 6.6-inch 165Hz 21:9 pOLED external display, making it the first smartphone to use Corning Gorilla Glass Ceramic 3. The internal display is an 8.1-inch 120Hz LTPO panel. The device measures 4.6mm thick when unfolded (excluding the camera module), 9.9mm when folded, and weighs 244g. The Razr Fold packs a 6,000mAh battery, supporting 80W TurboPower fast charging, 50W wireless charging, and 5W reverse wireless charging. It carries IP48 and IP49 ratings for dust and water resistance, and supports the Moto Pen Ultra stylus. The Razr Fold will ship with Android 16 and is promised at least seven major OS upgrades along with seven years of security updates. It will be available in Pantone Blackened Blue and Pantone Lily White. Pricing and exact availability have yet to be announced, but the device is set for release within 2026. Source


    Lenovo announces multiple new products at MWC

    At MWC 2026, Lenovo introduced a range of new products and concept devices.

    The Yoga Book Pro 3D concept laptop highlights its glasses-free 3D display, aiming to naturally present depth, shape, and spatial relationships on screen. The laptop features dual Lenovo PureSight Pro Tandem OLED displays. Powered by Lenovo’s in-house AI software, 2D images can be converted into 3D and shown on the upper display. Users can also use mid-air gestures captured via an RGB camera to zoom, rotate, and interact with content. The lower display supports an attachable keyboard, offering shortcuts for adjusting lighting, viewing angles, and color tones. The device is powered by an Intel Core Ultra 7 processor and an RTX 5070 GPU.

    The Legion Go Fold concept handheld features a POLED display that expands from 7.7 inches to 11.6 inches, with detachable controllers. It supports four usage modes: standard handheld mode, vertical split-screen mode, horizontal full-screen mode, and extended desktop mode.

    In extended desktop mode, the right controller can function as a vertical mouse. It includes a small display that can act as a touchpad, show game settings and performance metrics, or serve as customizable hotkeys. The Legion Go Fold is powered by an Intel Core Ultra 7 258V processor, features a 48Whr battery, and comes with 32GB of RAM.

    The Yoga 9i 2-in-1 Aura Edition (14″, 11) retains the Yoga series’ classic 360° convertible design. Lenovo positions it as a versatile drawing tablet. It features a 2.8K PureSight Pro OLED touchscreen with a peak brightness of 1100 nits and 100% coverage of DCI-P3, Adobe RGB, and sRGB color gamuts. It supports the Yoga Pen Gen 2 stylus, and the pen case magnetically attaches to the lid to create a canvas mode for improved ergonomics while drawing.

    The device continues to support the Yoga series’ multi-mode usage. It is powered by an Intel Core Ultra Series 3 processor and qualifies as a Copilot+ PC. Ports include two USB-C Thunderbolt 4 ports, one USB-A 3.2 Gen 2 port, and one HDMI 2.1 FRL port. It weighs 1.29kg and is expected to launch in March this year.

    The Yoga Pro 7a (15″, 11) is equipped with AMD Ryzen AI Max+ series processors and supports a unified memory architecture, allowing the CPU and GPU to share up to 128GB of RAM. It is compatible with the Yoga Pen Gen 2, and its Force Pad touchpad is powered by Wacom technology for drawing, automatically disabling touch gestures when the stylus is in use. The device features Lenovo X Power thermal technology, upgraded heat pipes, and dual fans, increasing thermal performance to 95W TDP while keeping noise levels as low as 22dB. It is expected to launch in June this year.

    The IdeaPad Pro Gen 2 tablet runs on the Snapdragon 8s Gen 4 mobile platform and integrates Lenovo AI solutions. It features a 13-inch 3.5K PureSight Pro display with Dolby Vision support. The tablet measures 6.2mm thick, weighs under 600g, includes a 10,200mAh battery with 45W fast charging, and is available in Moon Gray, Cloud Gray, and Mint.

    The IdeaPad Slim 5i Ultra (14″, 11) laptop offers either a WUXGA OLED or WQXGA IPS LCD 120Hz display. It houses a 65Wh battery, supporting up to approximately 20 hours of video playback. The device weighs as little as 1.15kg and measures 11.9mm at its thinnest point. It includes an FHD infrared camera for facial recognition and features a physical privacy shutter.

    The Legion Tab (8.8″, 5), known domestically as the Y700 (5th Gen), features an 8.8-inch 3K display with a 165Hz refresh rate and typical brightness of 600 nits. It is powered by the Snapdragon 8 Elite Gen 5 mobile platform, with configurations up to 16GB RAM and 512GB storage. The 9,000mAh battery is paired with Lenovo’s Legion Coldfront Vapor cooling system, improving thermal efficiency by 32% compared to the previous generation. The tablet weighs 360g and comes in black, white, and fluorescent green.

    The Legion 7a (15″, 11) gaming laptop also features AMD Ryzen AI Max+ series processors with unified memory architecture. It uses an aluminum chassis, weighs 1.65kg, and sports a 15.3-inch PureSight OLED display.

    Lenovo also showcased an AI Work Companion concept device resembling a desktop clock. Designed for interactive engagement, it uses AI to sync daily tasks and schedules across the user’s devices and can generate a balanced daily plan with a single tap. The device includes a built-in hub for desktop charging and features customizable physical buttons that can be configured as needed.

    Also announced were the Yoga Slim 7i Aura Edition, IdeaPad Slim 3i, L16 desktop monitor, and other new devices. Source


    HONOR unveils several new products at MWC

    At MWC 2026, HONOR announced several new products. The foldable flagship HONOR Magic V6 debuted in a new “Chitu Red” colorway, with its official domestic launch scheduled for March 10. HONOR also announced a strategic technology partnership with ARRI, aiming to “bring cinematic storytelling experiences to creators worldwide.”

    HONOR introduced the Robot Phone concept device as a new form of AI terminal. The Robot Phone features a motorized four-joint movable gimbal built into its camera module. The camera can perform AI-driven interactions and real-time feedback through movement, while also supporting three-axis image stabilization and intelligent object tracking. It can even “dance” in sync with music for interactive experiences. HONOR has launched a Robot Phone wish program, allowing users to receive updates on development progress and participate in user research. The device is envisioned to launch within 2026. Source

    At MWC 2026, HONOR also unveiled its first humanoid robot, HONOR ROBOT, which took part in a live dance performance, showcasing moves such as the moonwalk and a backflip. Source


    Qualcomm introduces the new Snapdragon Wear Elite

    On March 2 at MWC 2026, Qualcomm officially unveiled the new Snapdragon Wear Elite platform. The platform is designed to enable OEMs and AI cloud service providers to develop and innovate rapidly in this emerging space, deploying AI agents across a wide range of device form factors, including smartwatches, pin-style wearables, pendants, and more. The platform places significant emphasis on its integrated NPU, which has been substantially enhanced to run models with up to 2 billion parameters directly on-device. Combined with multimodal inputs from voice, vision, location, and various sensors, it enables highly personalized AI agents to support users in work, study, health, and everyday life. In terms of performance, the platform adopts a new five-core CPU architecture and integrates upgraded CPU and GPU components, delivering substantial performance gains. Compared to the previous generation, CPU performance improves by up to five times, while GPU performance increases by up to seven times. On the efficiency front, Qualcomm states that the platform can extend daily operating usage (DOU) by 30%, and can charge to approximately 50% in just 10 minutes. For connectivity, Qualcomm introduces what it describes as the most comprehensive connectivity suite yet for a wearable platform, supporting six different technologies: 5G RedCap, ultra-low-power Wi-Fi, Bluetooth 6.0, UWB (Ultra Wideband), GNSS (Global Navigation Satellite System), and NB-NTN satellite communication. Source


    iReader launches the iReader Tango 2 Pro e-ink reader

    On March 2, iReader unveiled the iReader Tango 2 Pro e-ink reader. The device adopts a smartphone-like form factor and is available in black and white. It features a newly developed in-house ultra-refresh technology, delivering a dynamic refresh rate of up to 50 frames per second, with flicker reduced to nearly zero. The reader supports SIM card insertion for cellular connectivity and enables WeChat voice functionality. An 8MP rear camera is included for QR code scanning. It uses a Carta 1300 e-ink display with freely adjustable color temperature and brightness. Powered by an 8-core CPU built on a 6nm process, the device comes with 8GB RAM and 128GB storage, with rated battery life of approximately 101 hours. The iReader Tango 2 Pro will go on sale on March 10, with an introductory price of RMB 1,999. Source


    Three updates from Alibaba’s Qwen

    Alibaba Unifies Its Large Model Brand Under Qwen
    On March 2, Alibaba’s large model team officially announced that it has unified the overall name and core brand of Alibaba’s AI under “Qwen.” The Qwen large model lineup covers both foundational models and domain-specific models, while the Qwen App serves as Alibaba’s flagship AI application for consumers. Following the rebranding, the Chinese name of Alibaba’s large model brand is 千问大模型, with the English name Qwen. “Tongyi Lab” will remain the organizational name of Alibaba Group’s AI research institution. Source

    Tongyi Lab Releases Two Natural Language–Controlled Speech Generation Models
    On March 2, Alibaba Cloud’s Tongyi Lab announced the release of two speech generation models built on the new FreeStyle paradigm: Fun-CosyVoice 3.5 and Fun-AudioGen-VD, aiming to push speech generation into a new stage of fine-grained control via natural language. Fun-CosyVoice 3.5 focuses on voice cloning and expressive optimization, with its core breakthrough being the ability to directly control generation results through natural language instructions such as “make the tone more firm,” without relying on preset tags. It supports multilingual voice cloning and adds new generation capabilities for Thai, Indonesian, Portuguese, and Vietnamese, while significantly improving pronunciation accuracy, prosody quality, and response latency. Fun-AudioGen-VD, on the other hand, focuses on building voices and auditory scenes from scratch. Based on text descriptions, it can directly generate specific timbres, emotions, characters, and even complete background environments and spatial acoustic effects, enabling integrated “character + scene” audio creation. Source

    Qwen AI Glasses G1 Open for Reservations Across All Channels
    Qwen’s first AI hardware product, the Qwen AI Glasses, went online for reservations on March 2 and will go on sale in China on March 8. The initial launch includes two series, S1 and G1, both powered by the latest generation Qwen large model. The devices offer industry-leading response speed and interaction smoothness, support high-precision multimodal understanding and real-time interaction, and cover key daily and office scenarios including high-definition photography, AI translation, meeting transcription, and image recognition. The G1 series, which will be available first, features dual flagship chips with dual systems, a five-microphone array with bone conduction, and high-performance large-diaphragm speakers. It adopts a lightweight design with a swappable battery experience, weighing only about 40g—comparable to ordinary optical glasses—and is equipped with an adjustable swan-neck bracket and FDA food-grade silicone nose pads for all-day comfort. The G1 integrates “smartphone-level” imaging technology, enabling 0.6-second rapid capture and 3K video recording, with AI super-resolution and frame interpolation to output 4K video. It also uses Super RAW low-light enhancement technology to significantly improve image quality and stability in low-light environments. With 64GB of built-in storage, it supports extended continuous shooting. The G1 series starts at RMB 2,899, with a subsidized price of RMB 1,997 after national incentives. Source


    Anker eufyMake E1 3D Texture UV Printer now available domestically

    On March 2, Anker announced via its official WeChat account that the eufyMake E1 is now exclusively available on JD.com, with full-payment pre-orders set to begin on March 12. Designed for makers and small studios, the printer supports 3D textured printing on a variety of materials. It can print on metal, glass, acrylic, and wood surfaces, simulating textures such as oil painting brushstrokes and embossed leather, with a maximum print height of up to 5mm. The companion app includes AI-powered creative features, allowing users to generate textures and relief effects. The printer supports flat printing, cylindrical printing, and UV transfer stickers. It also features a built-in JetClean self-cleaning system that automatically maintains the printheads to reduce the risk of clogging. Source


    Briefs worth a quick look

    • At MWC 2026, Leica joined Xiaomi in unveiling the Leica Leitzphone. In China, the device will be sold as the Xiaomi 17 Ultra Leica Edition in a black and silver colorway, with pricing starting at RMB 7,999. Source
    • Xiaomi has launched the Xiaomi Tag tracker, available in BLE and UWB versions, priced at RMB 69 and RMB 129 respectively. The Xiaomi Tag supports IP67 dust and water resistance and is powered by a CR2032 coin-cell battery. It is compatible with the iOS Find My app. The UWB version works with the Xiaomi 17 Ultra, Xiaomi 17 Pro Max, and Xiaomi 17 Pro. The BLE version is already on sale. Source
  • New Stuff 233|What SSPAI Editors Have Been Buying Lately

    New Stuff 233|What SSPAI Editors Have Been Buying Lately

    @张奕源 Nick:

    Bambu Lab P2S 3D Printer + AMS 2 Pro

    • Reference price: ¥3,994.15 (including AMS, after government subsidy)

    As mentioned before, I got into 3D printing because I wanted to work on home organization, so I ended up putting a Bambu Lab P2S in my apartment.

    Although the P2S has been out for more than two months, it’s still considered a new product from Bambu Lab. Since I entered the hobby relatively late, I didn’t experience the many earlier stages of consumer-grade and miniaturized 3D printers. My first hands-on experience was already with a nearly flawless, mature product, so in my eyes the P2S is close to perfect. Over the two weeks I’ve been using it, everything has felt fresh and exciting.

    First of all, it’s extremely easy to use—really, really easy to get started. You may have heard of their open model community, Makerworld. It’s full of all kinds of flashy, quirky, and unusual models you can download, and most of them already come with configurations tailored for Bambu printers. You just download the file, sync it with your specific model, and start printing directly—no parameter tweaking needed at all.

    Makerworld also has many niche but highly practical models, which happen to suit my needs perfectly. For example, I’m currently preparing for SSPAI’s Tracing the Southern Frontier project, which involves carrying a lot of filming gear, so I printed a set of battery cases, lens caps, and other accessories for Sony cameras. There are also various storage boxes designed specifically for small items like USB drives—great for travel, both practical and convenient.

    3D-printed lens caps and battery cases like these are not cost-effective to buy individually, which makes them perfect candidates for 3D printing.

    If you’re a super lazy person like me who hates hassle, you can just get an AMS along with the printer (or buy the bundle directly) and stick to Bambu Lab’s own filament. That way, the machine can automatically read information like color and remaining material, and it will handle loading, unloading, and filament switching by itself. You can pretty much reach a state of “the only thing you need to decide is what to print”—see a model you like, print it, and you’re done.

    Its ease of use also shows in how forgiving it is about placement. My apartment is small, and I don’t have space for a heavy, sturdy table, so I put the P2S on a small three-legged tea table in the kitchen. I was worried that the wobbling would affect print quality, but it turned out to be completely fine. Later I learned that the P2S has a built-in balancing and compensation system that automatically levels and stabilizes itself against small vibrations, so it’s much less delicate than I had imagined.

    Second, its output is very stable. I haven’t used many 3D printers, but the P2S is definitely the one with the best print quality among them. With default settings, the models it produces are already fine-grained and solid, and the printing process almost never goes wrong. The only time I encountered a “spaghetti failure” was due to an issue with the model design itself. Generally speaking, Bambu Lab’s companion app, Bambu Studio, will automatically determine whether a model needs supports, brims, and so on. If you also take a quick look at photos of other users’ finished prints or their feedback, you can usually avoid such problems altogether.

    The sliding-lid storage box fits together very precisely. After the purple filament ran out, I continued printing with pink, and the transition blended quite nicely too.

    Third, it runs very quietly, which exceeded my expectations. The P2S uses a fully enclosed design that blocks out a lot of noise, and most of what you hear during printing is a steady, mid-to-low-frequency sound that isn’t particularly irritating. The overall volume is roughly comparable to an air conditioner while it’s running. At first I placed it in the living room next to my desk, and working while it was printing wasn’t an issue at all. But since I plan to run long jobs overnight, I eventually moved it to the kitchen. Now I can’t hear it at all from the bedroom, so it doesn’t affect my sleep.

    Lastly, let me recommend a few models I’ve been enjoying recently. If you also have a 3D printer, you might want to try printing them.

    The first one is currently my favorite storage box: the single-color version of the “Mechanical-Style Storage Box.” It has a neat, boxy shape that makes it easy to arrange; its default size is just right, with generous capacity; and it supports stacking, with well-designed slots that let you build an endless tower. I’ve printed about ten of these already and used them to organize all sorts of random small items around the house—it’s surprisingly satisfying.

    Model link:
    https://makerworld.com.cn/zh/models/1018417-ji-jie-feng-ge-shou-na-he-ke-dui-die

    Super useful!

    The second one is “BUCKETS – Stackable Storage Boxes.” Among all the slanted-opening storage boxes I’ve printed, this is the best in both build quality and looks. It has thick outer walls and a large interior capacity, supports stacking, and its slim, narrow shape makes it perfect for fitting into corners and tight spaces. You can put almost anything in it—it’s very versatile.

    Model link:
    https://makerworld.com.cn/zh/models/1504594-buckets-ke-dui-die-shou-na-he-wu-xu-zhi-cheng

    Also very handy!

    The third one is a more niche model called the “Large Card Box with Sliding Lid.” It was originally designed as a tarot card box, and the pattern on the lid follows that theme as well. But it offers generous capacity, refined craftsmanship, and a relatively short printing time. Among all the sliding-lid boxes I’ve printed so far, this one has the best overall quality.

    Model link:
    https://makerworld.com.cn/zh/models/631847-dai-hua-gai-de-da-qia-pian-he

    It’s extremely detailed while using very little filament, making it a great match for wood-style materials.

    MelGeek Centauri 60 Magnetic Switch Keyboard

    • Reference price: ¥1,695.18 (launch promotion price)

    Buying this keyboard was half an impulse purchase. It looks good, the 60% layout is very compact, and I was also curious about how magnetic switches would feel, so I placed an order as soon as the product was released, becoming one of the first batch of users.

    Thankfully, this impulse wasn’t punished—the Centauri 60 is genuinely good to use. It comes by default with TTC White Magneto magnetic switches, which feel similar to tactile brown switches: straightforward, crisp, and not tiring to press. I mainly use it for typing and office work, and even with long sessions it doesn’t feel fatiguing. The snappy feedback also makes it easy to slip into a flow state, which is quite enjoyable.

    Further reading: https://sspai.com/post/105108

    The Centauri series also has a more flagship 80-key model. The difference is that it uses an 80% layout with an F1–F12 function key row, and includes an additional screen on the right side of the keyboard for viewing status information or adjusting settings. I personally prefer having my keyboard closer to the mouse and want it to be as small as possible, so I didn’t go for the larger version. The 60% layout also makes the whole keyboard look more compact, which I think is nicer than the 80%.

    I also really like the LED light strip on the Centauri 60. MelGeek designed a special effect for it that looks a bit like a snake looping around in circles, which adds a touch of fun to the keyboard and feels much more tasteful than the usual eye-searing RGB lighting.

    As for performance, I didn’t worry too much about it. I haven’t played CS in years, so I no longer have strong demands when it comes to latency or anti-ghosting. The web-based driver provided by MelGeek offers a full set of tuning options: you can define keys individually, or even copy configurations used by pro players, and the whole process is very straightforward. That said, this keyboard actually supports full customization inside and out—from the switches and internal foam, to the springs and mounting plate, and even the external metal decorative frame, all of which can theoretically be swapped or adjusted freely. For users who love to tinker, that’s definitely good news.

    MelGeek’s driver interface lets you adjust parameters for each key individually, or simply copy existing setups.

    That said, I do have one complaint about the Centauri 60: the lighting effects change too quickly. Even at the slowest setting, they still switch about once per second, so you can’t really get that gentle “breathing” fade-in and fade-out effect. This is actually something that could be solved at the software level. If anyone from MelGeek happens to see this, I hope you’ll consider adding a few more speed levels for the lighting, for the sake of us older users 🙂

    @克莱德: Xiaomi Label Printer

    • Reference price: ¥139 (with 3 rolls of label paper)

    Every time the seasons change, I end up digging through boxes to find clothes and bedding. And every year, I repeat the same eternal question to myself: what on earth did I put in that storage box on the top shelf?

    So this year, I finally decided to buy a label printer and put some “idiot-proof labels” on every storage container at home. Since this was a product category I had never really looked into before, I started with Xiaomi, a well-known brand for small home appliances.

    Unlike the label printers I had seen before that can print all kinds of images or invoice-style layouts, Xiaomi’s model is mainly designed for scenarios where you just need to stick labels everywhere. As a result, it uses consumables in the form of long, tape-like label strips with a fixed width, similar to transparent adhesive tape. In the Xiaomi app, you can manually set a fixed length for each label (up to 150 mm), or let the printer decide automatically based on the actual content.

    Naturally, label text is edited in the Xiaomi app as well. The built-in layout tools include styles, fonts, and alignment options. The style settings further cover basics like bold, italic, underline, character spacing, line spacing, and text direction. While moving text around, the app provides alignment guides, along with some preset alignment modes and fine-adjustment buttons. For everyday reminder labels, where there isn’t much need for complex design, these tools are more than enough. But if you want something more decorative or playful, it quickly starts to feel limited: there’s no emoji support, only a small selection of stickers, and a few built-in text-and-image templates—bordering on minimalistic, if not downright barebones.

    In my use case, though, the printed labels come out clear and sharp. The label paper also uses a split backing design that peels off down the middle, which helps avoid the common problem of reduced stickiness around the edges from handling it too much with your fingers.

    The only real drawback is that the labels default to a transparent background with black text, and only support black-and-white printing. They look fine on light-colored storage boxes or white appliances and electronics, but on dark surfaces they can be quite annoying. The only workaround is to sacrifice half the label’s width: peel off one side of the adhesive backing and print the text on the unpeeled half, effectively creating a white background with black text.

    @PlatyHsu: Laifen Swift 4 Hair Dryer

    • Reference price: ¥560 (after government subsidy; original price ¥659)

    I don’t usually have much need for a hair dryer—according to my mom, “what’s there to blow-dry with those few strands of yours anyway?” (For the record: I do still have a few.) But living in Shenzhen, you never know when the heavens will suddenly open up, so it’s always good to have something on hand to help you look presentable again quickly.

    My previous hair dryer was bought under exactly those circumstances: after running home in a thunderstorm, I spent a few dozen yuan on a food delivery app to get one. As you can imagine, its airflow was so gentle that even my few strands of hair found it a bit too civilized. Around that time, while browsing government subsidy deals, I came across Laifen’s hair dryers. I asked around among friends who had bought one, and the feedback was decent, so I picked up their newer model, the Swift 4, to try out.

    Laifen is known for taking inspiration from Apple, and sure enough, that reputation holds true. From the kraft paper shipping box and the way it’s sealed, to the plain white retail packaging with only a product image printed on it, to the layout of the instruction manual inside, and even the smell of the cleaning agent when you first open it—all of it gives off a strong “Apple flavor.”

    Getting back to the product itself, compared with earlier models, the main upgrade in this generation is the use of an aluminum alloy body, which looks fairly refined. The power cable comes with a cable organizer, though its length of 1.7 meters (not even as long as two phone charging cables) is a bit on the short side.

    In terms of performance, the Swift 4 is rated for a maximum wind speed of 23 m/s, which is quite fast. That said, because the body is compact, the overall air volume still can’t compete with those huge professional dryers that salon stylists use. For me, though, it’s more than enough. The maximum noise level is rated at 59 dB, which matches what I measured on my phone, and it’s fairly quiet. Depending on the operating mode, the circular light at the back of the dryer shows four different colors—a design that’s both eye-catching and attractive.

    These days, every household appliance seems to want a touch of “smart,” and the Swift 4 is no exception. It has built-in Bluetooth and can be paired with the Laifen app or a WeChat mini program. My limited imagination really can’t grasp why a hair dryer needs to be smart—and what’s even more absurd is that you can only pair and operate it while the motor is running—but fortunately, aside from scheduled hot-and-cold air cycling, there aren’t any features that absolutely require pairing. Most of the time, you can just ignore this part altogether.

    Overall, with the subsidy, the Swift 4 offers pretty decent value for money. It may still fall short of Dyson in some details, but for someone like me who only uses a hair dryer occasionally, it’s more than sufficient. If I had to nitpick, I’d say that simplicity and refinement don’t have to come in only one “Apple-style” form—perhaps Laifen could be a bit more creative and confident when taking inspiration.

  • SSPAI Morning Brief: Google Unveils the Universal Commerce Protocol (UCP), and More

    SSPAI Morning Brief: Google Unveils the Universal Commerce Protocol (UCP), and More

    Morning Brief

    1. Google unveils the Universal Commerce Protocol (UCP)
    2. Apple and Google reach a partnership on AI models
    3. Xianyu launches a collectible consignment service “Yuligou”
    4. Anthropic announces the launch of an AI healthcare service
    5. OpenAI acquires AI healthcare company Torch
    6. Google removes AI-generated summaries for searches involving specific medical keywords
    7. Instagram mistakenly sends millions of password reset emails due to a system bug
    8. China’s first 3D-printed aircraft engine completes its maiden flight
    9. Rumors You Can Just Glance At

    Google unveils the Universal Commerce Protocol (UCP)

    Recently, Google, together with retail giants such as Walmart, Shopify, and Etsy, introduced a new standard for AI shopping agents called UCP (Universal Commerce Protocol), which was officially announced at the NRF (National Retail Federation) conference in the United States. UCP is a new open standard designed to unify digital commerce. Google plans to integrate UCP-related services into its search engine and Gemini in the future, enabling users to find desired products more accurately and quickly when searching or interacting with AI, and to complete purchases directly via Google Pay without leaving the interface. It is also worth noting that at the same conference, Walmart officially announced a partnership with Google that will allow consumers to shop for products at Walmart and Sam’s Club directly through Gemini. This service will launch first in the United States and will later expand to global markets. Source


    Apple and Google reach a partnership on AI models

    On January 12, Google and Apple released a joint statement announcing that the two companies have entered into a long-term collaboration. The next generation of Apple Foundation Models will be built on Google’s Gemini large language model and cloud technologies. These models will power Apple Intelligence features as well as a more personalized version of Siri scheduled to launch later this year. The statement said that after careful evaluation, Apple believes Google’s AI technology is the best fit for Apple Foundation Models, and that Apple Intelligence will not alter its existing privacy commitments, including on-device processing and Private Cloud Compute. Previous reports claimed that Apple pays Google about USD 1 billion annually to integrate Gemini, and that the new Siri model would have around 1.2 trillion parameters. After the announcement, Elon Musk commented on X, saying that given Google also owns Chrome and Android, this collaboration looks like an “unreasonable concentration of power.” Source


    Xianyu launches a collectible consignment service “Yuligou”

    Recently, Xianyu has “quietly” rolled out its new trendy-toy consignment service, Yuligou. Under this program, Xianyu officially inspects the seller’s items. Yuligou strictly controls goods shipped directly from official sources to ensure authenticity and traceability. Items are either ordered by sellers through official brand channels (such as official apps, mini programs, or Tmall flagship stores) and shipped to the warehouse by changing the delivery address, or shipped directly into the warehouse by Xianyu-certified brand partners. From receiving and quality inspection, warehousing and listing, to order picking, packing, and shipping, the entire in-warehouse process is recorded on video, with professional procedures providing peace of mind. To avoid players relying on “luck-based blind draws,” all items sold on Yuligou are pre-inspected confirmed units rather than blind boxes. In addition, sellers set their own prices. The platform compares listings and displays the current lowest price for each item in real time, making it easier for buyers to compare prices and make purchases. Source


    Anthropic announces the launch of an AI healthcare service

    On January 11, Anthropic officially announced that its AI product, Claude, will roll out a healthcare service compliant with the U.S. Health Insurance Portability and Accountability Act (HIPAA). The service will be available to hospitals, medical institutions, and individual users for handling protected health information. Claude has also integrated multiple scientific databases and enhanced its support for biomedical research. For individual users, Anthropic will allow people to export their personal health data from apps such as Apple Health and Function Health, making it more efficient to organize medical records and share them with healthcare providers. Anthropic said that Banner Health, one of the largest nonprofit healthcare systems in the United States, already has more than 22,000 clinicians using Claude, with 85% reporting improvements in work efficiency and accuracy. The company is also collaborating with organizations including Novo Nordisk and Stanford Medicine. In addition, all healthcare-related responses are supported with citations from authoritative sources such as PubMed and the NPI Registry, and medical user data will not be used to train the model. Source


    OpenAI acquires AI healthcare company Torch

    On January 13, OpenAI announced its acquisition of the AI healthcare company Torch. Founded less than a year ago, Torch has released an iOS app designed to bring together users’ medical and health data — including hospital lab results, medication records, wearable device data, and direct-to-consumer testing services — into a single place, providing a unified “medical memory” for connected AI services. The four founders of Torch will join OpenAI. People familiar with the matter said the deal was an equity transaction valued at over USD 100 million. Source


    Google removes AI-generated summaries for searches involving specific medical keywords

    Recently, while testing Google’s AI summary feature, The Guardian found that for some medical-related keywords — such as several specific liver function blood test indicators — the summaries generated by Google omitted conditions that are crucial for interpreting those metrics and instead presented only numerical values. Experts interviewed by The Guardian said that some of these summaries were misleading and could cause users to misjudge their own health conditions. After the report was published, Google quietly removed the AI summary feature for the related keywords. A Google spokesperson said the company would not comment on individual removals, but that when the AI summary feature performs inappropriately, Google will make broader improvements and take action under its policy framework when necessary. Source


    Instagram mistakenly sends millions of password reset emails due to a system bug

    Over the past weekend, millions of users around the world received password reset emails from Instagram. Security organizations and media outlets suggested that Instagram might have suffered an information leak. Meta responded that there was a vulnerability in its system that allowed external third parties to bypass the normal verification process and submit password reset requests in bulk for some Instagram users. Because the requests appeared to be legitimate, the system automatically sent genuine reset emails to the registered email addresses of affected users. Meta emphasized that this was only a flaw that triggered the sending of reset emails and did not mean that its internal systems had been illegally accessed. The company said it has identified and fixed the issue, and users who received the emails can simply ignore them. Source


    China’s first 3D-printed aircraft engine completes its maiden flight

    According to People’s Daily, a turbojet aircraft engine produced using 3D printing technology and developed by the Hunan Power Machinery Research Institute of AECC (Aero Engine Corporation of China) has successfully completed a test flight in Dingbian County, Shaanxi Province. This marks China’s first domestically developed 3D-printed turbojet engine, filling a gap in the engineering application of full-engine 3D printing in the country. In the past, subtractive manufacturing required machining from a solid block of raw material, resulting in significant material waste. By contrast, 3D printing is an additive manufacturing process, with material utilization exceeding 90%. It also enables precision designs that traditional manufacturing processes cannot achieve, such as labyrinth-style cooling channels and integrated load-bearing structures, making designs more open and flexible. In addition, 3D printing technology allows manufacturers to switch between different products without adjusting production lines. Small-batch and customized production can shorten the R&D cycle by more than 30%. Source


    Rumors You Can Just Glance At

    • At CES 2026, Qualcomm officially unveiled its Snapdragon X2 Plus chip. The chip features a third-generation Oryon CPU, an integrated Adreno X2-45 GPU, and the latest Hexagon NPU. This brings notable performance gains over the previous generation, along with a significant reduction in power consumption, and more balanced improvements in AI and ray tracing performance. According to currently leaked CineBench benchmark scores, Apple’s M4 chip still leads in single-core performance with 173 points, compared to 133 points for the X2 Plus. In multi-core performance, however, the X2 Plus narrowly edges out the Apple M4 with 1,011 points versus 993 points. Source
    • According to the latest support documentation released by Microsoft, Microsoft Lens has been discontinued on both Android and iOS as of January 9, 2026. Starting February 9, the app will no longer be supported and will be removed from Google Play Store and Apple’s App Store. Users will still be able to scan documents until March 9, after which new scan requests will no longer be possible, though existing scan records can still be accessed via the last signed-in Microsoft account. Microsoft recommends switching to OneDrive for document scanning. OneDrive includes a built-in scanning feature that can be accessed by tapping the “+” icon at the bottom of the app interface. However, OneDrive does not save scanned files locally, storing them in the cloud instead. Source
    • Google has confirmed that Chrome 150, scheduled for release later this year, will be the last version to support macOS 12 Monterey. Source
    • Due to Australia’s ban on social media use by minors under the age of 16, Meta has removed 544,052 underage accounts since December 11, including 330,000 Instagram accounts, 170,000 Facebook accounts, and nearly 40,000 Threads accounts. Source
    • According to leaker Ice Universe, Samsung will adopt a new main camera sensor, the S5KHP6, on the S27 Ultra. The sensor has the same size as the HP2 released in 2023. Source
    • Microsoft announced the immediate retirement of the Microsoft Deployment Toolkit (MDT), an enterprise deployment tool first released in 2003. The software will no longer be supported, its download packages will be removed, and no future compatibility updates will be provided. Source
  • New Stuff 231|What Have the Editors at SSPAI Been Buying Recently?

    New Stuff 231|What Have the Editors at SSPAI Been Buying Recently?

    @Tp: Moondrop LAN 2 REF Edition + MC2

    • Reference price: Earphones ¥299, upgrade cable ¥139

    Picking up from the previous post, when I went to buy the NiceBuds, I first noticed the ¥99 Bamboo 2 in the shop and felt a bit tempted. But after browsing around on Bilibili, I realized it didn’t really have anything that stood out to me. On top of that, many people mentioned issues like easily broken pins and inconsistent volume between the left and right earpieces, so I passed on it. While looking up related impressions, I discovered that the LAN 2—released in two versions—actually received quite decent reviews. After some comparison, I decided to pick one up to get a taste of what people call “Hi-Fi.”

    Moondrop’s LAN 2 comes in a POP version and a REF version. The former has a moderate boost in the low frequencies and, according to the official description, is more suitable for pop music, while the latter is better suited for instrumental listening. Since I don’t like that kind of bass that pounds your head, I chose the REF version. In my personal experience, the REF version gives a very clean and transparent listening impression. Especially when listening to instrumental albums with no vocals, such as The Moonlight Zoo, or the orchestral sections in Sodagreen’s album Winter, Ended, each instrument is clearly distinguishable while still blending together harmoniously. Even with pop music, the REF version performs quite well to my ears.

    What surprised me the most was how these earphones helped me notice small details in arrangements that I used to overlook. For example, at the beginning of Wu Qingfeng’s Outsider, there’s a faint “da-da” sound in the background. I first noticed this detail with the LAN 2 REF. When I went back to listen with other earphones, I found that the sound was actually there too—but it was easily masked by other melodies and hard to pick out.

    In terms of comfort, the LAN 2 is quite comfortable for me. The stock cable in particular is soft and slim, making it much more comfortable than a similar in-ear model I tried before. After switching to the MC2, however, the cable became thicker, and the over-ear section no longer used the relatively rounded, wrapped design of the stock cable, making the cable feel much more noticeable on my ears.

    MC2 (left) vs. stock cable (right)

    As for why I bought the MC2 cable: on one hand, the stock cable uses a 4.4 mm connector. Although Moondrop includes a 4.4-to-3.5 mm adapter, having an extra dangling adapter never feels quite right. On the other hand, I wanted in-line controls to change tracks. While the three-stage volume buttons on the side of the iPod nano 7 can be used to skip tracks without waking the screen, I still have to take the device out, which is a bit inconvenient. As for sound quality, honestly, I can’t really tell any difference between the stock cable and the MC2.

    For an ordinary listener like me, who isn’t a hardcore audiophile, the LAN 2 REF version does bring a somewhat different listening experience. At the very least, since getting it, I’ve switched my daily listening from EarPods to these.

    @张奕源Nick: Snapmaker U1 Color 3D Printer

    Note: We also produced a video hands-on of the Snapmaker U1 at the same time. The content differs from New Stuff and can be used as a supplement to the text version. Click to watch.

    Friends, I’ve recently been wanting to properly organize both my home and office desks, which is what got me interested in 3D printing.

    The 3D printing community strongly embraces the open-source spirit, and on various model platforms you can find all kinds of fun and practical storage box designs. For someone like me, with potentially large and ongoing needs, batch printing makes more sense than buying finished products—both economically and in terms of customization. With 3D printing, you can adjust dimensions and even iterate through trial and error, which fits my personalized needs much better.

    As it happens, Snapmaker (Kuàizào Technology) recently launched their consumer-grade color 3D printer, the Snapmaker U1, on JD.com. Our office got one right away, and I kicked off my 3D printing journey by “borrowing the company machine.”

    Snapmaker U1 exterior

    The biggest highlight of the Snapmaker U1 is a system called SnapSwap™—an independent four-head parallel setup. Put simply, this system allows four independent print heads to work on a single print job together, eliminating the need for mid-print filament swapping and purging, and enabling true one-pass multicolor printing.

    The basic idea works like this: before a print job starts, the U1 preheats all four print heads. Once preheating is complete, all four heads remain on standby. During printing, when a specific head is needed, the machine switches to it directly. The U1 uses a steel-ball positioning coupling structure, ensuring precise alignment and secure locking when the print-head exchanger grabs a head—without relying on screws, magnets, or additional motors. The entire head-switching process can be completed in as little as five seconds.

    Independent four-head parallel system: all four print heads stay on standby, and the machine simply “grabs” whichever one it needs

    This independent four-head system isn’t just for show—it delivers real efficiency gains. With traditional single-head printers, multicolor printing requires filament swapping and purging, which means stopping the print mid-job and manually changing materials. After each swap, the printer also has to purge the nozzle, producing a significant amount of waste. This back-and-forth costs both time and material, making it far from economical. With the U1, manual filament swapping and purging are eliminated. All four heads are prepared in advance, and automatic head switching during printing is so fast it’s practically negligible. In effect, you can complete multicolor prints in roughly the same time as single-color ones, dramatically boosting efficiency.

    The machine can also print with multiple materials in a single job

    Thanks to this capability, there are plenty of time-saving workflows you can explore. I often print storage boxes of the same size in different colors, so when setting up a job I’ll place multiple models in different colors on the same build plate. That way, the printer can produce multiple components in one go, saving the time of repeatedly starting new jobs, reheating the machine, and reloading materials. If you want the finished product to look a bit more playful, you can also assign colors while arranging the layout. From my simple comparisons, as long as the base model is the same, there’s little difference in total print time between single-color and multicolor jobs. So the strongest impression the U1 left on me is that even multicolor printing remains highly efficient—you don’t have to worry about it slowing you down.

    You can tweak colors during layout to fully leverage the U1’s efficiency advantages

    And because there’s no repeated mid-print filament swapping, the U1 only needs to purge the print heads once at the start of each job. The larger and more frequent your print batches, the more material cost you save. All waste material is neatly collected in the waste box, which only needs to be emptied about once a week.

    The waste box is hidden at the rear of the machine

    Beyond its core four-head parallel system, the Snapmaker U1 performs well in other areas too.

    First, print quality is solid. All my print jobs use the standard 0.4 mm nozzle and the default 0.2 mm layer height, yet the U1 still delivers sufficiently fine layers and detailed results.

    The built-in Charmander model: scales and horns are rendered with impressive detail

    Second, nearly all functions are automated—one-click filament unloading and loading, automatic multi-head calibration, automatic bed leveling, and more. Combined with parameter adjustment and camera monitoring via the mobile app, you can basically walk away once a print starts. Many of my prints are set up after work and left to run overnight in the office; I just pick up the finished parts the next day, which is incredibly convenient.

    Real-time print progress monitoring via the mobile app

    Snapmaker has a strong following overseas. While searching for tutorials and references, I came across many YouTube creators reviewing and sharing their experiences, and the maker community seems to really appreciate Snapmaker’s high value-for-money products with a distinct design ethos. Interestingly, before the U1 arrived, our office already had an older 3D printer, but few people paid much attention to it. Since getting the U1, however, many colleagues have started asking how to print their own items or proposing product ideas. It really shows that when a printer is efficient and easy to use, it can spark creativity.

    Multicolor products printed with the Snapmaker U1

    The Snapmaker U1 is currently available in stock on JD.com. After national subsidies, prices start at RMB 4,504.15, making it highly competitive in its class. If you’re looking for a low-fuss, high-efficiency desktop color 3D printer, the Snapmaker U1 is definitely worth a look.

    @鲸鱼鱼: Cookie Budget — Lifetime Membership

    • Reference price: RMB 68

    As a long-time SSPAI reader, I feel a certain obligation to tinker with budgeting apps—and to spend money on an app to track how I spend money. After using MoneyWiz and MOZE on and off for several years, I realized my needs are actually very basic: by the end of the month, I just want to know roughly where my money went. For me, these professional, feature-heavy budgeting apps feel a bit “over-specced.” So when I heard that MOZE’s subscription price was about to increase, even though I was reluctant to part with its polish and professionalism, the higher fee made me reconsider whether it was really necessary. That’s when I started looking for a new budgeting app.

    After asking fellow editors and AI for recommendations, I downloaded several budgeting apps to try briefly. Cookie Budget stood out as the one that impressed me the most at first glance. First, its overall design is clean, and the little cookie icon—true to its name—adds a touch of cuteness. Second, Cookie offers a feature specifically for tracking software subscriptions, with support for multiple currencies and automatic entries upon renewal. Subscription management and expense tracking are unified in one place, so there’s no need to jump between apps—perfect for my lazy instincts. Third, in terms of functionality, it covers everything I need, including iCloud sync and basic reports.

    Widgets, icons, and subscription management

    However, as I explored more features, I also noticed some less intuitive design choices. Cookie’s accounting logic differs slightly from MoneyWiz and MOZE. For example, the latter apps use receivables and payables to cover scenarios like loans, reimbursements, and paying on someone else’s behalf. In Cookie, these are split into more specific entry points, such as lending assets, borrowing assets, reimbursement records, or initiating a bill refund to calculate split payments. Take splitting the cost of milk tea with colleagues as an example: in MOZE, one transaction plus a receivable does the job, but in Cookie, you need to record the total first and then handle the split as a refund-based AA collection. The receivable flow feels more roundabout. That said, laziness really is the primary productivity driver—I simply treat all AA receivables as reimbursements. While this sacrifices some statistical granularity, the steps align better with my thinking and feel smoother to use. There’s another limitation in Cookie’s categories as well: a single transaction can’t be assigned to multiple categories. If you buy groceries, household supplies, and toys in one supermarket trip, you have to record three separate transactions in Cookie.

    The reimbursement record and subscription management buttons are also inconsistently placed—one on the left, the other on the right

    In addition, Cookie feels a bit rough around the edges in some details:

    • Expense categories support hierarchies, but all default categories are single-level. Some are very broad, like clothing, food, housing, and transportation, while others—such as water bills, electricity bills, or snacks—really belong at a second level. It takes quite a bit of effort to reorganize everything properly.
    • Subscription information defaults to the “app subscriptions” category, but for convenience I deleted that category and replaced it with a broader “applications & software” category. When creating new subscriptions, however, they still default to the now-nonexistent “app subscriptions” category. I couldn’t find any way to change this default, so I have to manually adjust it every time.
    • The feature hierarchy isn’t very clear, and some actions are hidden away. Subscriptions have auto-recording enabled by default, but there’s no option to toggle this when creating a new subscription. For subscriptions where I want to confirm renewal at expiration, I can only disable auto-recording afterward by going into the subscription details and using the menu in the top-right corner.

    That said, Cookie overall meets my needs and simplifies my workflow for both subscription tracking and general expense logging. The development team has also maintained a steady cadence of one or two updates per month in recent years, continually refining the product. And considering that its lifetime membership price is relatively affordable among budgeting apps, it still feels like a worthwhile investment overall.

    @路中南: Cat Slow Feeder

    • Reference price: RMB 20

    I have two cats at home. The pure-black older one was adopted years ago from a rescue shelter in Shenzhen with Lao Mai, and it’s of the same lineage as the office’s calico cat, Diandian. However, this creature has had one habit unchanged for years: eating far too fast. Perhaps that’s exactly why it’s overweight (7 kg+), and why it occasionally vomits piles of undigested kibble—something that’s become even more frequent in winter. If it happens when no one’s home and the robot vacuum blindly rolls over it, the trouble can be huge. And yes, that did happen to me last month.

    Let’s just call it Black Pig. From its official name “Juanjian,” to the nickname “Little Black,” and finally to the moniker “Black Pig,” it only took about two years. Over those two years, I tried quite a few methods to ease its vomiting (it’s heartbreaking to watch your clumsy eldest vomit): switching to warm water in winter (helpful, but easily contaminated by dust), making a DIY rolling bottle feeder (which it completely ignored, only charging like a pig whenever the automatic feeder dispensed food), and so on. This time, Taobao recommended a cat slow feeder, and after using it for two weeks, here are my thoughts.

    Why is it called a “slow feeder”? Because the cat has to “solve a puzzle” to earn its food reward. Before buying, I read a lot of reviews for similar products, and many negative ones complained that “my cat doesn’t know how to use it,” so the feeder ended up unused. I, however, was full of confidence—and that’s thanks to our second cat, Er Huang. The uniquely named second son, a mischievous spirit cat who purrs the moment you touch his haunches. His “intelligence fur length” (note: the fluffy fur at the tips of a cat’s ears—folklore says its length is directly proportional to a cat’s intelligence) should have no trouble with a level-three difficulty feeder. And sure enough:

    The look a smart cat gives while watching a dumb cat eat

    Comparing the two cats’ behavior, Er Huang uses his paws to flip and dig out the kibble underneath with ease. Black Pig, on the other hand, only knows how to push around with his head. Sometimes he even has to follow the second cat while eating just to get a few bites.

    The confusion of a pig who only knows how to shove with his head (4× speed)

    Either way, Black Pig’s eating speed has slowed down. And because I put more fragrant, tastier domestic cat food in the tray (ad space available here), Black Pig now refuses to eat the diet food from the automatic feeder. Instead, he either sneaks off alone to shove the puzzle tray in search of food, or tails along behind the second cat to eat some leftovers.

    This tray is definitely a “I bought it and I’m OK with it, but I wouldn’t recommend you buy it” kind of product. First, it requires a certain level of feline intelligence. Second, it’s better suited for larger items like freeze-dried treats or snacks, rather than regular kibble. Kibble tends to get stuck in the narrow gaps of the mechanisms, making it hard for cats to retrieve, and over time it also goes stale.

    @JIAJUN: Mickey Paw Mug

    • Reference price: Mickey Paw Mug: ¥129, Pingu Money Tree: ¥79, Mushroom: ¥89

    Sometime last autumn or winter, a gift suddenly appeared on my desk—air-dropped by a colleague. When I opened it and saw Mickey’s little paw, I could only think: wow, this is way too good a gift.

    As a present, it’s a solid 120 out of 100. Perhaps to achieve that adorable paw shape, the mug itself is very large and very heavy. Although the official demo shows two different ways to use it, only after actually trying it did I realize how taxing it is to drink from something with a net weight of 780 g. With the first grip, holding hot water makes your hand feel scalded, and it also feels a bit unstable; with the second, hand-supporting grip, the feel is completely different from a normal mug and hard to get used to. I personally give its practicality a 60 at best, and had no choice but to give up on using it as a daily cup.

    For a while, I couldn’t think of a better use for it, so I put it back in its box and let it lie quietly in a corner.

    After N days, during a major cleanup at home, I felt it would be such a waste to leave something this cute unused. Looking around, I noticed that it fit perfectly with a Pingu money tree I already had at home—turns out it makes a pretty nice flower vase, and I was very satisfied. A few months later, the other unused paw finally found its own plant as well: a mushroom from Furry Forest.

  • SSPAI Morning Brief: OpenAI Releases GPT-5.2 and More

    SSPAI Morning Brief: OpenAI Releases GPT-5.2 and More

    Morning Brief

    1. OpenAI Releases GPT-5.2
    2. Snapmaker U1 Color 3D Printer Launches
    3. Amazon to Allow Authors to Publish Kindle Books Without DRM Protection
    4. OpenAI Announces Integration with Select Adobe Apps
    5. Tencent QQ Group Chats Add Support for Yuanbao AI Summary Feature
    6. Alibaba Releases Qwen3-Omni-Flash Multi-Modal Model
    7. Qualcomm Announces Acquisition of Ventana Micro Systems
    8. Rumors You Can Just Glance At

    OpenAI Releases GPT-5.2

    On December 12, OpenAI announced the launch of its GPT-5.2 model lineup, positioning it as the most suitable model for everyday professional use. According to OpenAI, GPT-5.2 delivers overall improvements in table generation, presentation creation, coding, image understanding, long-context processing, tool use, and complex multi-step tasks.

    The GPT-5.2 series includes three versions: Instant, Thinking, and Pro. Among them, the Thinking model stands out for significantly reducing hallucinations, making it more suitable for professional AI agent applications that require high reliability. Companies such as Notion, Box, Shopify, Harvey, Zoom, and Databricks participated in pre-release testing. OpenAI also noted that GPT-5.2 will play a more central role in AI-agent workflows, with the long-term goal of shaping ChatGPT into a highly personalized intelligent assistant. Source

    Logos for OpenAI and the Walt Disney Company in white on a background of swirling purples, blues, and magenta OpenAI also announced a three-year licensing agreement with Disney. Sora and ChatGPT Images will gain the ability to generate video and image content featuring characters from Disney, Marvel, Pixar, and Star Wars. The related features are expected to roll out in early 2026, with some generated content showcased on Disney+. Source

    In addition, Disney has issued a cease-and-desist letter to Google, claiming that Google used Disney works without permission to train AI models, and subsequently generated and distributed images and videos featuring Disney-related characters for commercial purposes. Source


    Snapmaker U1 Color 3D Printer Launches

    On December 12, the color 3D printer Snapmaker U1 made its debut on JD.com. The Snapmaker U1 features the SnapSwap™ independent four-head parallel system, supporting multi-color and multi-material printing with quick toolhead switching. According to the company, in multi-color printing scenarios the device can switch toolheads in about 5 seconds, improving efficiency and reducing material waste. Compared with traditional single-nozzle color-changing methods, Snapmaker U1’s four-color printing tasks can reach speeds of up to 500 mm/s and complete prints within 5–6 hours. While achieving up to a fivefold increase in overall efficiency, the design also reduces material usage by about 80% thanks to its purge-free channel structure.

    Snapmaker U1 supports automatic calibration, input shaping, pressure advance, automatic bed leveling, and other features to ensure clean edges, smooth walls, and sharp details even in high-speed printing mode. Its printing parameters include a build volume of 270×270×270 mm, along with AI print monitoring and app-based management.

    Snapmaker U1 is priced at 5,299 RMB exclusively on JD.com (4,504.15 RMB after national subsidies). Buyers can still claim an exclusive privilege package before 7 p.m. on December 12, with pre-orders officially opening at 8 p.m. The Snapmaker U1 will also be showcased at an offline experience event at the JD MALL Beijing Shuangjing store from December 16 to 17. Source


    Amazon to Allow Authors to Publish Kindle Books Without DRM Protection

    Amazon has announced that beginning January 20, 2026, authors who choose not to enable DRM (Digital Rights Management) in the Kindle Direct Publishing workflow will be able to offer their e-books to readers in more open formats such as EPUB and PDF. Previously published books will not have their DRM settings changed automatically; authors must manually update their preferences in the KDP dashboard. Once an author updates the DRM status, the change may take up to 72 hours to appear on Amazon’s main site.

    Amazon stated that the new option is intended to make it easier for readers to access content they have purchased. However, some authors believe the move may actually increase the number of people choosing to enable DRM. Source


    OpenAI Announces Integration with Select Adobe Apps

    On December 11, Adobe launched three applications—Photoshop, Acrobat, and Adobe Express—inside ChatGPT.

    The new integration allows users to perform image editing, PDF modification, and various design tasks directly within ChatGPT using natural language, without switching to standalone applications. Users only need to mention the app in conversation and describe what they want; the system will then generate selectable results or present interactive UI controls, such as sliders for adjusting brightness and contrast.

    Although these integrated apps do not offer the full capabilities of their desktop counterparts, Photoshop can still perform local edits, creative effects, and image parameter adjustments; Acrobat can edit PDFs, compress or convert formats, extract text and tables, and merge files; Adobe Express can generate and edit posters, invitations, and social media graphics. All creations can be exported at any time to Adobe’s native software for further refinement.

    According to Adobe, these ChatGPT applications are currently available on desktop, web, and iOS. On Android, only Adobe Express is supported for now, with Photoshop and Acrobat coming later. Source


    Tencent QQ Group Chats Add Support for Yuanbao AI Summary Feature

    On December 11, Tencent QQ announced via its official Weibo account that group chat messages now support the Yuanbao AI summary feature. When a group accumulates a large number of unread messages, users can tap “AI Summary” in the upper-right corner of the chat interface, and—after granting permission—generate a summary of the conversation. QQ also stated that the summary results are visible only to the user, and the related data will not be stored or used in any other context. Source

    Alibaba Releases Qwen3-Omni-Flash Multi-Modal Model

    On December 9, 2025, Alibaba’s Qwen team released the next-generation native full-modal model, Qwen3-Omni-Flash-2025-12-01.

    Upgraded from Qwen3-Omni, the new model supports unified input across text, images, audio, and video, and provides real-time streamed text output and voice capabilities. This update focuses on improving issues in multi-modal interactions—such as unnatural speech performance and unstable transitions in multi-turn conversations—by adjusting speech rate, pauses, and prosody to enhance overall interaction quality.

    Alibaba has also strengthened the controllability of Qwen’s system prompts. Users can now define the model’s behavior patterns, including tone, style, and content length, with improved execution accuracy. In addition, Qwen’s multilingual capabilities continue to expand, now supporting 119 text languages, 19 speech recognition languages, and 10 speech synthesis languages.

    In terms of performance, Qwen3-Omni-Flash-2025-12-01 shows improvements over the previous version on several benchmarks, including ZebraLogic (logical reasoning), LiveCodeBench-v6 (code generation), and MMMU (multidisciplinary visual question answering). Source


    Qualcomm Announces Acquisition of Ventana Micro Systems

    On December 10, Qualcomm announced its acquisition of Ventana Micro Systems, further strengthening its technological presence in the RISC-V domain.

    Qualcomm stated that the Ventana team will complement its existing Oryon in-house CPUs and RISC-V development efforts, jointly advancing the company’s technologies across business lines in the AI era. The company also noted that the RISC-V architecture holds significant potential for driving CPU innovation, and this acquisition marks an important step toward building industry-leading RISC-V CPU technology.

    Founded in 2018 and headquartered in Cupertino, Ventana Micro Systems focuses on high-performance, scalable, and secure computing chip solutions based on the open RISC-V architecture. The company is a board member of RISC-V International as well as a member of its Technical Steering Committee. Source


    Rumors You Can Just Glance At

    • During a televised broadcast, Donald Trump mistakenly described 6G technology as something capable of displaying deeper image or skin-detail layers, failing to understand that 6G actually refers to the next-generation mobile communication network. His comment drew attention on site, while Qualcomm CEO Cristiano Amon—who was on stage with him—did not correct the statement. As early as 2019, Trump had called for the U.S. to accelerate 6G development to avoid falling behind other nations. He has also made past remarks such as “the Moon belongs to Mars” and incorrectly linking Apple to 5G infrastructure construction. Source
    • The startup Operation Bluebird has filed a petition with the U.S. Patent and Trademark Office, arguing that Elon Musk’s X Corp. effectively abandoned the “Twitter” and “Tweet” trademarks after rebranding and discontinuing use of the associated branding, and that the trademarks should therefore be canceled. The company has also applied for a new “Twitter” trademark for its upcoming social platform, Twitter.new. In its petition, Operation Bluebird claims that after the rebrand to “X,” X Corp. no longer uses the original trademarks, citing Musk’s previous public statements about “saying goodbye to the Twitter brand forever.” Some legal experts note that although the claim has some basis, the “residual goodwill” of the Twitter brand could be a key factor, as many users still refer to X as “Twitter” and continue using terms such as “tweet.” X Corp. must submit a response by February next year. Operation Bluebird stated that it stands firmly by its position and will continue pursuing relevant legal actions. Source
    • According to tech outlet MacRumors, internal firmware for iOS 26 reveals:
    • The new AirTag is expected to receive upgrades across pairing workflow, battery notifications, and tracking capabilities. In particular, it aims to deliver more accurate location tracking when the device is in motion or in crowded environments. The new AirTag may also feature a next-generation ultra-wideband (UWB) chip, expanding the range of Precision Finding. There have been no clear rumors of noticeable exterior redesigns; the overall appearance may remain consistent with the current model, though improvements to the speaker structure could reduce risks of malicious tampering or misuse. Although iOS 26 refers to the device as “2025 AirTag,” current product timing suggests its official release may slip to early 2026. Source
    • Apple is advancing development of a new smart home hub device. The product will include a camera and support Face ID for identity verification and user recognition, enabling automatic switching between user profiles. The hub is expected to rely heavily on Apple Intelligence and the next-generation Siri set to launch next year. Based on current reports, this smart home hub may take a form somewhere between an iPad and a HomePod, featuring an approximately 7-inch square display and an optional speaker dock. The device is expected to debut alongside iOS 26.4 and the updated Siri.
    • Code references also reveal an unreleased accessory device codenamed J229, believed to be a home security camera under development by Apple, though its release timeline has not yet been disclosed. Source
  • SSPAI Morning Brief: Apple Announces 2025 App Award Nominees, Huawei Unveils MatePad Edge, and More

    SSPAI Morning Brief: Apple Announces 2025 App Award Nominees, Huawei Unveils MatePad Edge, and More

    Morning Brief Highlights

    1. Apple Announces 2025 App Award Nominees
    2. Huawei Unveils the MatePad Edge 2-in-1 Tablet
    3. Bambu Lab Releases New H2C 3D Printer
    4. Microsoft to Improve Windows 11 Advanced Recovery Tools
    5. EA Announces It Will Not Release F1 26

    Apple Announces 2025 App Award Nominees

    On November 19, Apple revealed the finalists for its 2025 App Store Awards. For mainland China, the nominated apps of the year are Tide, CamScanner, and CapWords, while the nominated games of the year are Adventurer’s Diary, Infinity Nikki, and Valorant: Genesis Protocol. Source

    In terms of global nominations, the list includes 45 apps across 12 categories. In addition to hardware-specific categories for iPhone, iPad, Mac, Apple Watch, and Apple Vision Pro, Apple has retained the classic “Cultural Impact” category. The shortlisted titles include well-known products such as Acorn, Infinity Nikki, HBO Max, Assassin’s Creed: Shadows, and Cyberpunk 2077. Source

    Huawei Unveils the MatePad Edge 2-in-1 Tablet

    On November 19, at the “HarmonyOS Office New Product Tech Briefing,” Huawei unveiled its first HarmonyOS 2-in-1 tablet, the MatePad Edge. The product blends the interaction paradigms of laptops and tablets, letting users switch between “Tablet Mode” and “PC Mode,” with the system UI and interaction logic adapting according to the chosen mode.

    An illustration of the product’s design and interaction features, image from Huawei

    Hardware-wise, the MatePad Edge comes equipped with a 14.2-inch flexible OLED “Cloud-Clarity Soft-Light” display, with overall performance output reaching up to 28W. It ships with the HarmonyOS 6 operating system by default. The product will be officially unveiled at Huawei’s new product launch event on November 25.

    Bambu Lab Releases New H2C 3D Printer

    On November 18, Bambu Lab introduced its new 3D printer, the Bambu H2C. The H2C supports core capabilities such as seven-color single-pass printing, integrated printing of rigid parts and flexible joints, as well as multi-material unified-form printing. It comes equipped with the Vortek hotend-switching system, allowing seamless coordination with Bambu AMS (Automatic Material System), enabling a fully automated material-changing process. The printer can also store material information in the hotend to ensure each hotend is matched with the correct filament. When printing with more than seven filament colors, the system can calculate the optimal mapping combinations to minimize purge waste.

    The product supports eight-second induction heating and adopts a fully enclosed design with an adaptive air-circulation system, along with fully automatic multi-nozzle offset calibration. Inside, it features Bambu’s self-developed PMSM servo extruder motor capable of delivering up to 10 kg of extrusion force. Its proprietary servo extrusion system performs intelligent 20 kHz current and position signal sampling, actively detecting filament abrasion and clogging in real time. It also includes 65°C active chamber heating to suppress model warping and deformation, while enhancing interlayer bonding for high-performance and high-temperature filaments.

    In addition, the H2C is equipped with a 59-sensor array and a four-camera computer-vision system. These work together through Bambu’s proprietary neural algorithms to detect subtle anomalies during printing and provide real-time intelligent diagnostics. The intelligent monitoring system continuously tracks extrusion status, instantly identifying filament buildup, extrusion deviation, and extrusion failures.

    Product appearance image, image via Bambu Lab

    In terms of connectivity, the H2C supports cloud connection while also offering local LAN mode and physical connection operations, allowing users to control the printer, send slices, and update firmware without needing an internet connection. The developer mode also enables users to operate the printer with third-party accessories and software through MQTT. The Bambu Lab H2C starts at an initial price of 14,999 RMB, with multiple bundle versions available. Source

    Microsoft to Improve Windows 11 Advanced Recovery Tools

    On November 19, Microsoft announced that it will introduce several new recovery tools and features in Windows 11, aiming to help users restore their computers to a normal working state after catastrophic failures.

    The first feature is Point-in-Time Restore, which allows users to roll back the computer to the exact state of a previous moment. This feature will be enabled by default and automatically captures a snapshot every twenty-four hours. After a crash, users can directly restore via these snapshots in WinRE, with each snapshot retained for seventy-two hours. The second feature is that the WinRE recovery environment will support networking. The improved WinRE will extract network drivers from the main Windows system, initially supporting Ethernet, with WPA 2/3 Wi-Fi support coming later. The third feature is Cloud Rebuild, primarily designed for enterprises. IT administrators can configure OS installation data, and during the reinstallation process, all data can be preserved through OneDrive for Business. Source

    EA Announces It Will Not Release F1 26

    On November 19, EA announced that the racing game F1 25 will cover both the 2025 and 2026 F1 seasons, and that F1 26 will not be released as a standalone title. Instead, it will become a paid expansion pack for F1 25, introducing new cars, new regulations, new teams, new drivers, and more.

    The next mainline entry in the F1 racing simulation series will arrive in 2027. According to EA, the new title will deliver a much more refined F1 gameplay experience across handling, mechanics, and various other aspects. Source

    Related Reading:

  • Low-Cost, Scalable CyberBrick Replica: Build Your Own 3D-Printed RC Car

    Low-Cost, Scalable CyberBrick Replica: Build Your Own 3D-Printed RC Car

    Introduction to Bambu Lab CyberBrick & Why This Project Exists

    First of all, Bambu Lab is a consumer-grade 3D-printer manufacturer whose printers—especially the A1 series—have received widespread praise. The A1 series even sells for around just ¥1,000.

    Meanwhile, Bambu Lab operates MakerWorld, a large-scale model-sharing platform where beginners (those with zero modeling experience) can download community-made 3D designs and print them directly.

    However, most 3D-printed objects are static—meant only for display or simple hand-manipulation. If you want your 3D-printed car to actually move, you need experience in electronics and circuitry. To address this, Bambu Lab released the CyberBrick kit, enabling beginners to create a remote-controlled 3D-printed car using simple, LEGO-like building blocks—adding a whole new layer of fun.

    Here’s the official CyberBrick introduction from Bambu Lab:

    CyberBrick is a modular smart-toy ecosystem that integrates programmable hardware, 3D-printed structures, and a dual-layer coding environment. It combines 3D printing with electronics and programming through LEGO-like simplicity. CyberBrick allows anyone to build and enjoy a wide range of 3D-printed creations—from RC toys to productivity tools.

    However, the CyberBrick kit is not cheap. A starter set costs ¥199, and each set can only drive one toy car. That’s why I started this project: replicating “Bambu Lab CyberBrick” using inexpensive components—not only reducing cost but also unlocking more possibilities.

    I call this project OpenCyberBrick. Let’s begin.

    Disassembly & Replication Strategy

    The Core Logic of CyberBrick

    Back during the CyberBrick crowdfunding phase, I already had a rough understanding of its structure and logic through introductions and demo videos. On the day the CyberBrick kit officially launched, I bought the starter set and printed the official truck model to test it.

    Although CyberBrick divides its system into a controller and a receiver, both sides use the same ESP32-C3 mini as the main control board—and they’re interchangeable. The controller side gathers input from joysticks, buttons, switches, etc., through a “remote-control baseboard” and sends that data to the receiver. The receiver side takes the incoming signals and, using its own “remote-control baseboard,” drives motors, servos, LEDs, and other output devices. Communication between the controller and the receiver appears to use ESP-NOW, a proprietary ESP protocol.

    Replication Approach

    Once we understand the core logic of CyberBrick, the replication strategy becomes clear.

    • Main Control Board Communication Protocol: For the main control board, we also use Espressif’s ESP-series chips. The ESP8266, ESP32, and ESP32-C3 are all inexpensive and come with built-in Wi-Fi modules. Communication between modules can be handled through ESP-NOW, which conveniently solves the issue of transmitting control signals.
    • Controlled Unit: The controlled unit uses an ESP8266 connected to an L298N motor-driver module (for driving the motors), a 9g servo (for steering), and a WS2812 LED strip (for headlights, turn signals, and lighting effects).
    • Remote Control Unit: The remote unit uses an ESP32-C3 connected to two PS2 joystick modules (each with two built-in buttons), plus two additional button modules, forming a 12-channel controller capable of supporting a large number of actions.
    • During later optimization, I realized that using a smartphone as the controller is actually more suitable. It supports more actions while eliminating the hardware and software cost of building a separate remote controller. Therefore, in the following sections, the remote-control replication will only be introduced briefly.

    Detailed Look at the Controlled Side

    3D-Printed Jeep Body

    First, just like with CyberBrick, we need to 3D-print the Jeep parts and assemble them. But one thing to note: since we’re using loose components with much lower integration than CyberBrick’s custom modules, they take up significantly more space. Therefore, choose a larger model—small bodies won’t have enough room for the electronics.

    I chose Willy’s CyberBrick RC Jeep for this project. The front trunk of this Jeep provides enough space to house the electronic components, and its structure is quite typical: a motor is used to drive forward and backward, a servo handles steering, and there are reserved slots for LED lights.

    Jeep Electronics Layout

    Above is the wiring diagram for the Jeep’s electronics. Here are the pitfalls I ran into:

    • Different modules require different operating voltages. For example, the ESP8266 needs a stable 3.7V supply, the servo and LEDs require 5V, and the motor-driver module works within a voltage range (the higher the voltage, the stronger the torque). If you want the entire system to run from a single battery, you must add buck/voltage-regulation modules before each device.
    • 7.4V batteries are relatively expensive and require dedicated chargers. But 3.7V 18650 and 14500 cells can be found in many discarded toys and electronics. I made a series-connection wire to combine two 3.7V cells into a 7.4V pack—just make sure the cells have matching internal resistance when you use them in series.
    • The ESP8266’s GPIO pins connect to the signal interfaces of the motor driver, servo, and LED modules, and output PWM signals for control. However, the ESP also needs to share a common ground with all these devices.

    Software Program

    ESP devices support Micropython and Arduino. Since I have some Python experience, I chose Micropython for development.

    The software portion of the project is already uploaded to GitHub: OpenCyberBrick GitHub / OpenCyberBrick Gitee.

    Here is what each file does:

    • jeep_motor.py — Motor driver program. Controls motor direction and speed to achieve forward/reverse movement.
    • jeep_servo.py — Servo driver program. Controls servo angles for steering.
    • jeep_led.py — LED driver program. Controls two WS2812 LEDs, enabling headlights, reverse lights, turn signals, and light-show effects.
    • wifi.py — Connects the controller to Wi-Fi for LAN-based control.
    • wificonfig.json — Stores network information and can be edited through the remote webpage.
    • jeep_action.py — The action dispatcher for the Jeep. It converts received remote-control signals into motor, servo, and LED commands. GPIO pin assignments are also configured here.
    • jeep_espnow_rec.py — ESP-NOW listener. Continuously receives ESP-NOW packets and forwards them to jeep_action.
    • jeep_websocket_rec.py — Runs a WebSocket server, receives commands from a LAN webpage, and forwards them to jeep_action.
    • main.py — Main program entry, used to select which control-signal source to listen to.
    • jeep_remote_index.html — The H5 remote-control page, supporting both button and gyroscope-based motion control. This file is not uploaded to the ESP—save it on the phone used as the controller.

    Remote Control Module Overview

    Unlike CyberBrick, this project ultimately works best with a smartphone controller, even though I also implemented a standalone hardware remote. When using the phone, you can switch between button control and motion-sensor control.

    ESP-NOW Remote Control

    ESP-NOW control can actually be treated as an independent project—it can control not only CyberBrick replicas but any ESP-based device. It consists of both hardware and software components:

    The hardware portion consists of an ESP32 connected to two PS2 joysticks, two regular buttons, a power supply, and a switch. The software portion, also written in Micropython, retrieves data from the PS2 joysticks and buttons, formats it, and forwards it to the controlled device. This remote can even switch between different controlled devices via buttons, allowing a single controller to operate multiple units.

    This remote-control project may be introduced in a separate article later.

    Mobile Webpage Button Control

    Using a dedicated remote and a separate controlled device is still fairly costly. So why not use something everyone already owns—a smartphone—as the controller? The answer is of course yes. ESP devices have Wi-Fi capabilities, meaning they can connect to your home network via a router or create their own hotspot to form a local network.

    On the controlled device’s ESP controller, a server runs in the background to receive command requests from other devices on the network and translate those commands into actions for the Jeep.

    On the controller side, you can open an HTML page on your phone; button presses and releases on that page are sent to the server, enabling remote operation. There are a few special considerations:

    • Since ESP devices have extremely limited memory, the server cannot return HTML content. Therefore, the control-page HTML file must be saved on the phone beforehand. On iPhone, you can open local HTML files using HTML Viewer. On Android, you can tap the HTML file and open it in a browser.
    • Because real-time responsiveness is critical for a remote controller, ordinary HTTP GET/POST requests would put heavy load on the server. Instead, the system uses WebSocket long-connections, which maintain real-time performance while greatly reducing server load.

    Mobile Gyroscope Control

    Button-based control is simple and intuitive, but it’s not quite “cool” enough. Gyroscope control, on the other hand, is cool. On the HTML page, the phone’s gyroscope data is captured, and changes in the phone’s orientation are translated into actions for the Jeep. For example:

    • X-axis:
      Tilt less than –20° → move forward
      Tilt greater than 20° → move backward
      Between –20° and 20° → stay still
    • Y-axis:
      Tilt less than –20° → turn left
      Tilt greater than 20° → turn right
      Between –20° and 20° → stay still
    • Z-axis: not used.
    • The X and Y axes can be read simultaneously, allowing combined movements such as forward-left, forward-right, backward-left, and backward-right.

    Cost Calculation

    If the smartphone is used as the remote control, the entire system only includes the Jeep’s on-board electronics. Here’s a rough breakdown of the cost:

    • ESP8266 or ESP32 controller: 11.7 RMB
    • One L298N motor driver: 7.42 RMB (you can definitely find cheaper alternatives; I just used what I had)
    • Two N20 motors: 6.16 RMB (30.8 RMB for 10 pieces)
    • One 9g plastic servo: 4.7 RMB
    • Two WS2812 LEDs: 0.37 RMB (11 RMB for 60 pieces)
    • Two DC-DC voltage regulators: 3.6 RMB (1.8 RMB each). If you’re knowledgeable about capacitors, a cheap capacitor may suffice.
    • Two 3.7V 14500 batteries: 0 RMB — you can salvage them from old toys or electronics.
    • Wires, terminals, and a switch: about 2 RMB.

    Total: 35.95 RMB.
    This does not include some mechanical components required by the Jeep model, such as screws and bearings.

    More Possibilities

    Most of the functionality above is designed to match CyberBrick’s capabilities, though implemented differently on the remote side. But in fact, we have far more room to expand: adding a screen to the ESP-NOW controller, adding a screen to the Jeep, adding sound effects, adding an obstacle-avoidance sensor, and so on. This is where the OpenCyberBrick project can offer greater flexibility and fun.

    Conclusion

    This article only introduces the general logic of the project. There are many more hardware and software details not covered here due to space constraints. If you’re interested in this project, feel free to leave me a message — I’d be happy to discuss it.

    If you know how to design PCBs on JLCPCB and you’re interested in my projects, I very much welcome you to contact me. Let’s build something fun together.