In a previous article, I shared how I spent nearly two years building an e-ink display from scratch.
System Architecture Overview
For readers who haven’t read the previous article, here’s a brief introduction to the hardware and software structure of the project, along with links to the open-source repository (GitHub | Gitee).
Hardware Structure
The hardware setup consists of four main components:
- ESP32 main controller: the brain of the system, responsible for receiving data, processing it, and sending display data. I’m using the ESP32-S3, as the larger memory is required to create a 400×300 buffer.
- E-ink display driver board: acts as a bridge between the development board and the display. This was purchased on Taobao—just search for “compatible with Waveshare e-ink driver.”
- 400×300 e-ink display: the final output screen. I used a retired off-brand e-ink panel from a supermarket, also purchased on Taobao. As long as it’s compatible with the Waveshare driver, it should work. Similar displays can also be found on second-hand platforms like Xianyu.
- 3D-printed enclosure: organizes the messy wiring into a clean, product-like form factor.
- Dupont wires: used to connect all the hardware modules above.
Software System
- The software is built using MicroPython, which I’m familiar with. The structure is relatively straightforward:
- main.py: the main entry point of the project, where you can configure the operating mode of the e-ink display.
- wifi.py: handles Wi-Fi connection and time synchronization. Based on configured network credentials, it connects to the internet and syncs system time.
- wificonfig.json: stores the Wi-Fi SSID and password. In manual update mode, these can also be modified through a web interface.
- ink_calendar.py: the perpetual calendar program used in fully automatic update mode.
- ink_websocket.py: enables the ESP32 to run a server for passive and manual update modes.
- ink_display.py: a general-purpose module for rendering content on the e-ink display.
- epaper4in2.py: the driver for the e-ink display.
- ink_index.html: a local HTML file used for manual updates.
After publishing the first article, many readers asked whether the project could be open-sourced. I also realized there were many areas for improvement, so I recently spent some time iterating and upgrading the project.
With these upgrades, the e-ink display now supports multiple update methods:
- Automatic update mode: updates the day’s calendar information automatically at 8:00 a.m. each morning;
- Passive update mode: after receiving an SMS, an iPhone Shortcut automatically syncs information to the e-ink display;
- Manual update mode: update content by entering text or uploading images through a web interface.
Next, I’ll walk through these three modes one by one:
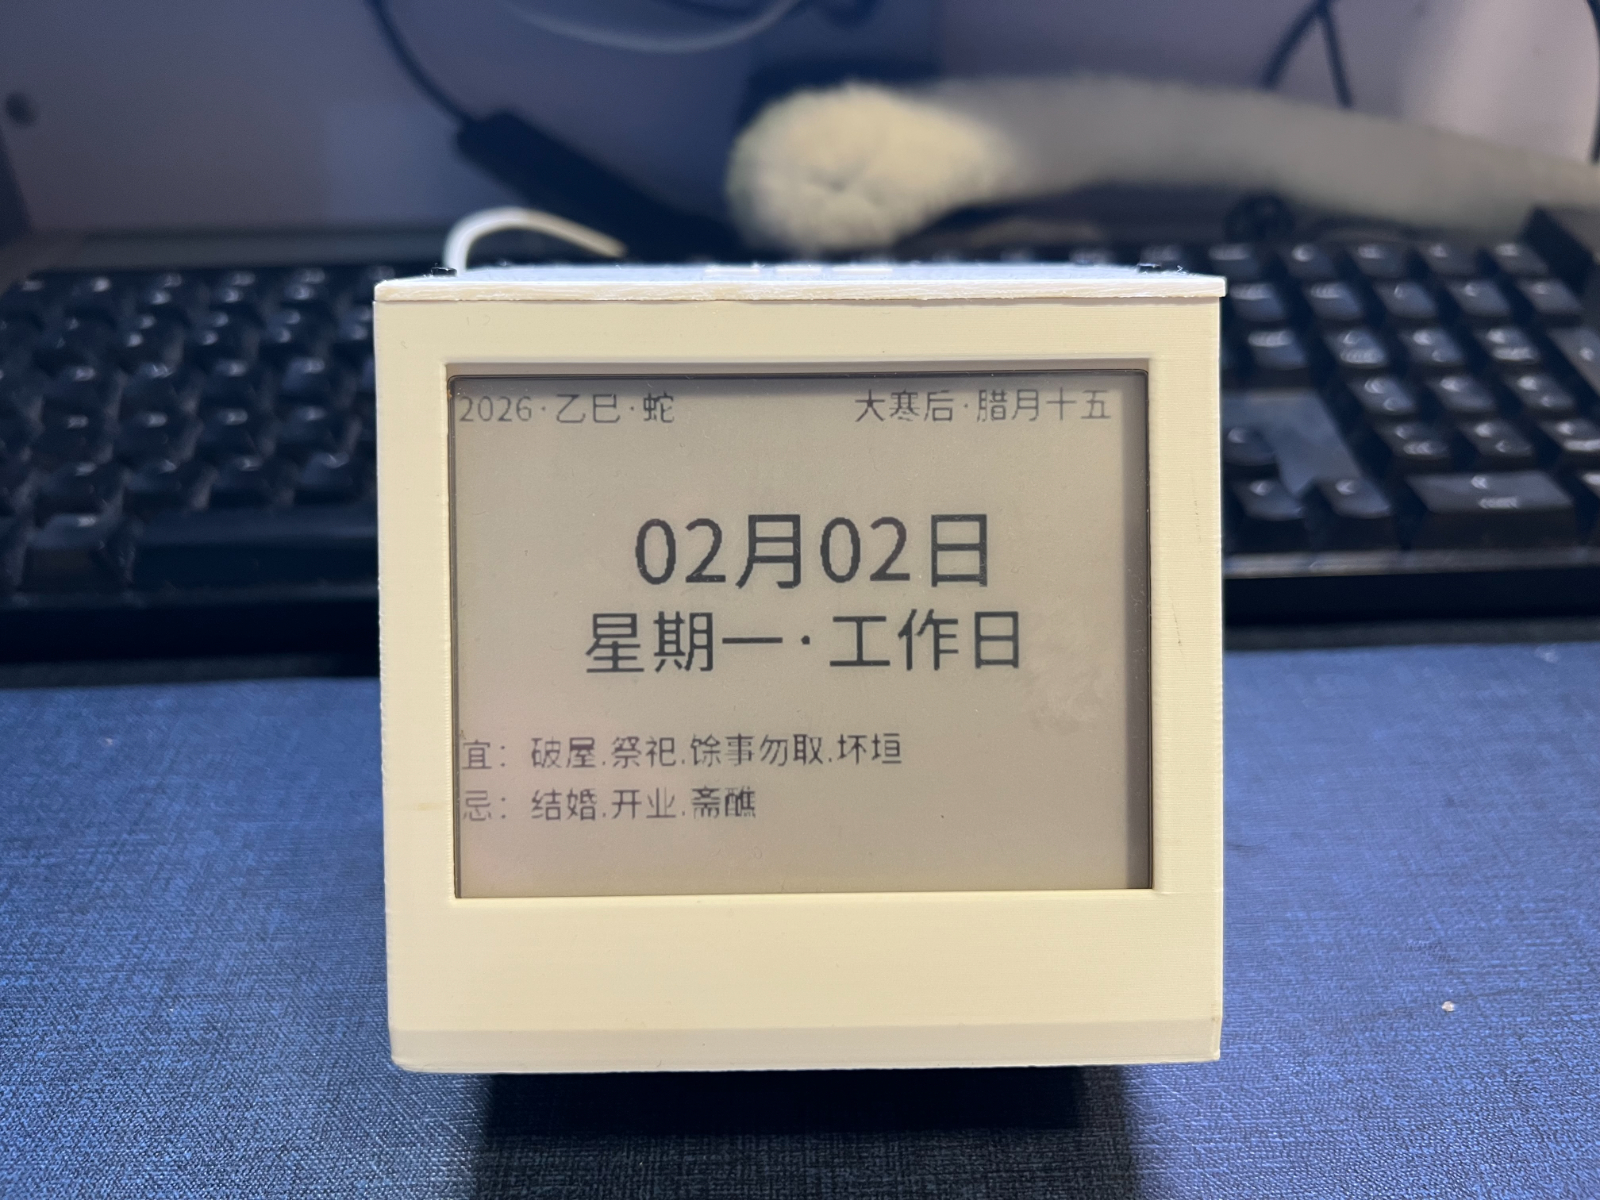
Automatic Update Mode: Perpetual Calendar
Effect Preview

How It Works
On the previous day, the server (currently running on my own computer) automatically requests relevant APIs based on the current date to retrieve the next day’s calendar information, and then renders it into an image, as shown below:

The server then further processes this image into data readable by the e-ink display and uploads it to a public OSS location. Each client (i.e., the e-ink display device) will, at 8:00 a.m. every day, request the corresponding OSS address based on the current date, retrieve the image data, and render it on the display.
In this mode, the image generation process is handled entirely on the server side (regardless of how many clients there are, the server only generates it once). The client only needs to connect to the internet and periodically request the corresponding address to update the e-ink display.
Passive Update Mode: Sync to the E-Ink Display Upon Receiving SMS
Effect Preview


How It Works
The ESP32 controller of the e-ink display runs in server mode, ready to receive and process HTTP or WebSocket requests. On the iPhone, a Shortcut is created to send incoming information to the ESP32 server.

Then, another automation is set up on the iPhone: whenever an SMS is received, it automatically triggers the previous Shortcut to send the content to the ESP32 server.
Since the ESP32 has limited performance and lacks image processing capabilities, it forwards the received data to a cloud-based “Function Compute” service. This service processes the data into image format and returns it to the ESP32, which then displays it on the e-ink screen.
This mode also enables broader use cases, such as automatically syncing iPhone to-do lists to the e-ink display, displaying incoming emails, and more. Essentially, any information accessible via Shortcuts can be synchronized.
However, this approach also has its drawbacks: since the mobile device does not send image data directly, and the ESP32 cannot process images on its own, a real-time online backend service is required. Although the cost of such serverless function computing is relatively low, it still introduces additional overhead.
Manual Update Mode: Enter Text or Upload Images for Updates
Effect Preview


How It Works
While thinking about better ways to solve the “server-side image generation” problem, I had a sudden realization one day: modern smartphones are already powerful enough—why not generate the image data directly on the phone and then send it over?
Similarly, the ESP32 controller on the e-ink display runs in server mode, ready to receive and process HTTP or WebSocket requests. On the client side, a webpage (essentially a single-page application) is opened. Through this page, users can connect to the e-ink system over a local network, input text to generate images and cast them to the display, or upload images, crop them appropriately, and then cast them.

During the casting process, the frontend webpage uses JavaScript to process text and images, transmitting the image data to the ESP32 controller via WebSocket. After receiving the image data, the ESP32 saves it as a file in its local directory, and the system reloads the image data from the directory for display.
This mode does not require any additional cloud services, but it also has its limitations: since I haven’t solved the issue of requesting HTTP local resources under an HTTPS environment, it’s not possible to deploy this single-page application as an online service. Users need to download an HTML file and open it locally—on Android, this can be done directly from the file system, while iPhone users need to install an additional app (such as an HTML viewer) to open the local HTML file.
Conclusion
This e-ink display project has been ongoing for quite a long time. Each time I set it aside and learned something new elsewhere, I would come back and apply those learnings to further iterate and improve the project. Throughout the process, I’ve experienced a strong sense of accomplishment.
There are still many aspects of the project that could be optimized, but since I don’t intend to turn it into a fully polished “product,” I may consider wrapping it up at its current stage.
Some areas for improvement include:
- Solving the issue of requesting HTTP resources in an HTTPS environment, which would make it possible to launch a universal single-page application. Users would no longer need to download an HTML file—just open a web page, enter the IP address, and update the display.
- The ESP32-S3 controller is still relatively expensive. If the display can be updated without using a buffer approach, a more affordable ESP32-C3 might suffice.
- The current 3D-printed enclosure mainly serves to tidy up the wiring and is relatively bulky. Optimizing the wiring layout could reduce the overall size.
- The current power supply relies on USB. If only the perpetual calendar mode is used, the device only needs to perform updates once per day at 8:00 a.m., and can remain in deep sleep the rest of the time—making battery power a viable option.
Anyone interested is welcome to build upon this and continue exploring.
Leave a Reply